Tag: recipe

Savory Vegetable and Goat Cheese Tart {Blogger of the Month}

By Ceri Wilkin, Miss August 2014

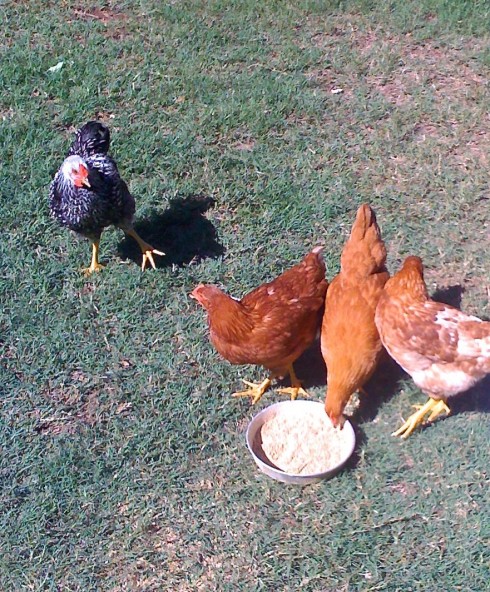
As soon as Fayetteville passed the ordinance to allow chickens within city limits, we were down to the local farmers co-op, choosing four adorable chicks, and eagerly carrying them to their new home in our backyard.

Initially they had the run of the place, but there is no toilet training a chicken, and cleaning off the pool deck became tedious every time we wanted to swim. So they now enjoy scratching, pecking and perching in their custom made coop, and we enjoy collecting their eggs from one place, as opposed to having to search for them throughout the yard.

I’m not sure my palate is sophisticated enough to notice a difference in taste between store-bought eggs and our yard eggs. However, the difference in nutritional value, and color is significant, and an unexpected perk – chicken psychology and behavior is fascinating!

chickens

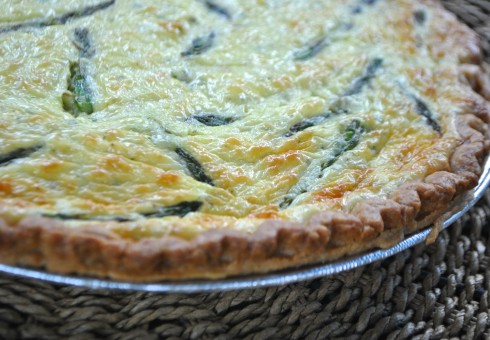
SAVORY VEGETABLE AND GOAT CHEESE TART

savory vegetable and goat cheese tart

1 store bought pie crust
1 to 2 bunches of asparagus
3 tablespoons of olive oil, divided use
salt and freshly ground black pepper
1 tablespoon butter
5 green onions, thinly sliced
8 ounces soft goat cheese
1/4 cup creme fraiche
1/4 cup cream
1 tablespoon finely chopped flat leaf parsley
1 tablespoon finely chopped fresh chives
2 teaspoons finely chopped fresh tarragon
3 eggs

Bake crust according to package instructions. Let cool on a wire rack.

Heat oven to 425F. Line a baking sheet with foil. Cut off the top 1 to 1 1/2 inch of the asparagus tips. Toss in a small bowl with 2 tablespoons of oil, season with salt and pepper. Place in a single layer on prepared sheet, roast, turning once, until asparagus is bright green and tender, about 8 to 10 minutes. (I roasted this at the same time as I baked the crust).

Reduce oven temperature to 375F.

Heat remaining 1 tablespoon of olive oil and butter in a medium skillet over medium heat. Add sliced asparagus stalks and green onion, season with salt and pepper. Cook, stirring often, until onions are soft and asparagus is bright green and tender, 6 to 8 minutes. Let cool slightly, spread evenly over bottom of tart crust.

Whisk goat cheese, creme fraiche, cream, parsley, chives and tarragon, in a medium bowl. Season with salt and pepper. Whisk in eggs. Pour over vegetables. Scatter asparagus tips over the top. Bake tart until the edges of the crust are golden brown and filling is set, 20 to 25 minutes. Let cool in pan for 20 minutes.

Enjoy!

Recipe adapted from Bon Appetit, May 2012

Kumara Salad {Blogger of the Month}

By Ceri Wilkin, Miss August 2014

I moved away from the country in which I was born in my early 20’s. Along with a sense of adventure, fun and excitement, I felt a touch of homesickness, naturally for family, friends, and the familiar, but also for foods I had grown up with.

My friend and I were a bit of an oddity in Lake Charles, Louisiana, not only talking with a strong and unusual accent, but also using different and unusual words. The telephone line wasn’t busy, it was engaged and we filled our chilly bin with ice and drinks. My friend eventually moved back to New Zealand to be with her boyfriend, but as I had traveled half way around the world to see and experience the USA, I stayed – and moved up one whole state, but a world away, to Arkansas.

My first time back to New Zealand, I loaded up with cheese that squeezed out of a can, Oreo cookies and every imaginable peanut butter and chocolate combination, to the delight of my friends and family. While there, my mealtime desires would be satisfied for a time, and I returned bearing every food I was allowed within the bounds of traveling internationally. I even attempted to bring a Kumara, or native sweet potato, into the country, but my conscience insisted I declare it, and of course it was taken away by the customs officials.

Pumpkins that were familiar, which I would roast or turn into soup, not just decorate with around Fall and Halloween, recently started to appear at our local farmers market, and New Zealand wines are readily available at our local liquor store. Then to my great delight, I found in a supermarket right around the corner from where I live, disguised as a Japanese Sweet Potato, the staple vegetable of every roast dinner I had growing up, Kumara. It was wonderful to find locally, what I had been missing from across the globe.

Kumara

Kumara Salad

Kumara Salad

1 kg Kumara, peeled and chopped into 2 cm pieces

2 tablespoons olive oil

4 rashers of bacon

2 teaspoons honey

2 teaspoons Dijon mustard

1 tablespoon white wine vinegar

1/4 cup olive oil

4 spring onions, sliced

Heat the oven to 200C. Toss the Kumara in the olive oil and place in a single layer in a roasting dish. Cook for 30 to 35 minutes until kumara is golden and tender.

Meanwhile, heat a small frying pan over high heat and cook the bacon until crisp. Remove from heat and chop into pieces.

Place the honey, mustard and vinegar in a small bowl and whisk to combine. Add the olive oil in a slow, steady stream while continuing to whisk.

Toss the kumara, bacon, and spring onion together in a bowl, drizzle over the dressing and stir to combine.

Enjoy!

Recipe adapted from The Foodtown Magazine, April/May 2007

Snickerdoodle Cupcakes {Foodie Friday}

Snickerdoodle Cupcakes
Written by Jennifer Martin of Imitation by Design

If you’re like most folks, you have certain foods or flavors that instantly transport you back to your mother’s or grandmother’s kitchen table. Because I love to eat, I have a long list of these magical foods, but one in particular came to mind this weekend… snickerdoodles.

We ate a lot of these growing up because they were one of those cookies you nearly always had the ingredients in your pantry to make. I remember helping to roll the dough into balls and dredging them in cinnamon and sugar, sneaking little bites of cookie dough during the process.

As much as I LOVE cinnamon, I always forget to make these. Luckily, these incredible Snickerdoodle Cupcakes evoke the same memories of baking cookies with my mom and grandma.

Snickerdoodle Cupcakes are like crack for cinnamon lovers. Seriously.

This recipe starts with a plain white or yellow cake mix that gets a boost of flavor with the addition of butter, vanilla and cinnamon to the batter. You’d be surprised at how changing a few of the ingredients in your cake mix’s recipe can fool friends and family into thinking you‘ve baked it from scratch.

This delectable cupcake is topped off with a simple, homemade cinnamon buttercream icing. Decorate them quickly by using a decorator’s bag and a large star tip or by filling a ziploc bag and snipping off the end to make speedy swirls on each cupcake.

Even if these Snickerdoodle Cupcakes don’t transport you home to mom’s kitchen, I hope they’ll tickle your taste buds.

Recipe

Cake:

1 plain white or yellow cake mix
1 c whole milk
½ c melted butter (1 stick)
3 large eggs
1 tsp vanilla extract
2 tsp cinnamon

1. Preheat oven to 350° and line two 12 cup muffin pans with cupcake liners or dust and flour them.

2. In a large bowl combine all of the cake ingredients. Beat on low for one minute and then scrape down the sides. Increase the mixer speed to medium and beat an additional 2 minutes, scraping down the sides occasionally.

3. Use an ice cream scoop or a ¼ cup measuring cup to divide batter into muffin tins. I only got 20 muffins by using the scoop, but if you use a ¼ cup measuring cup, you can get 24.

4. Bake 20-24 minutes or until a toothpick inserted comes out clean.

5. Remove from tins and cool completely on a wire rack.

6. Frost with recipe below.

Icing:

1 ½ sticks salted butter (not margarine) at room temperature
5-6 Tbsp milk
1 ½ tsp vanilla
1 ½ tsp cinnamon
5 ½ c powdered sugar

1. In a large bowl, beat the butter on medium speed until fluffy.

2. With the mixer on low, add 4 tablespoons of milk, vanilla and cinnamon. Add powdered sugar 1 cup at a time, allowing each cup of sugar to be fairly well incorporated before adding another. (You could dump it in all at once, but you’ll be cleaning powdered sugar out of every nook and cranny in your kitchen for days. Just trust me on this one. ;))

3. Once the powdered sugar is fully incorporated, increase your mixer’s speed to medium and whip for 2-3 minutes, until light and fluffy. Add more milk if needed to achieve desired consistency.


Jennifer lives in Hope, AR and is a wife and stay at home mom. She enjoys cooking, decorating, gardening and spending time with her family. Her blog Imitation by Design is her way of keeping track of her family’s favorite recipes and meals and sharing them with others.

Recipe Review {Foodie Friday}

Written by ARWB February 2012 Blogger of the Month, Gina Knuppenburg of Desperately Seeking {Gina}.


Perusing my collection of cookbooks you’d probably find it interesting seeing Disney’s Family Cookbook {link: http://www.amazon.com/Disneys-Family-Cookbook-Irresistible-Recipes/dp/078686382X } amongst all the other more grown-up cookbooks.  I bought it fifteen or sixteen years ago when I was a nanny.  I loved cooking and baking for my charges and this particular cookbook was fabulous for baking with kids.

It’s filled with simple, tasty recipes easy enough for kids to help with, whether it’s scooping flour, mixing batters, or even just licking the spoon.  The book is filled with large, colorful photographs, easy-to-read recipes, and comes spiral bound for easy maneuvering.  The outside cover is durable enough to stand up to sticky hands {as evidenced by my much used copy} and splatters wipe off easily.


One of my old favorite recipes to make with my two charges was PB & J Surprise Muffins {you can find the recipe here}. {<~~~link: http://familyfun.go.com/recipes/peanut-butter-jelly-surprise-muffins-676593/ }


I remember making these multiple times and enjoying them every time.  With this batch, however, I received only mediocre results.  The muffins were better eaten immediately after baking, but seemed dry after  a few hours.  Reheating didn’t seem to help. Also, I would definitely recommend adding 2 teaspoons of jam instead of the as-written one teaspoon.


I was slightly disappointed that they just didn’t taste the way I remembered them!  So, I asked myself how I could make them better and this is what I heard:


“Self, what goes with peanut butter better than anything??”  And, I answered!  Chocolate.


I added five “chunks” of Nestle Tollhouse Chunks per muffin.  In retrospect, I could have added at least five more.


I liked the chocolate better, but sadly, they were still a tad too dry for my liking.  Any foodies out there have any suggestions how to improve this recipe?

You can learn more about Gina by reading her blog Desperately Seeking {Gina} or by checking out her Blogger of the Month Page.

In an effort to eat more veggies, today I shall have carrot cake {Foodie Friday}

 written by Shannon of Still Seeking Martha 

In an effort to eat more veggies, today I shall have carrot cake!

I love a good carrot cake. Honestly, I love cake PERIOD! There is just something about a carrot cake that makes me feel like a kid again.

In a single bite it takes me right back to the “pie” auctions the Cattlemens Association used to have.

I loved going to the auction with my Godfather. What little kid wouldn’t want to go bid on cakes and pies?!? Plus, everyone always said things like “Oh, I see you brought the boss with you.” Me? The boss? Alright I could handle that.

My Godmother, in what I chose to believe was an effort to make me smile throughout the year, but was more likely an effort to keep her husband’s wallet a little thicker, started making me carrot cake any time I asked.

Yes, I was that spoiled by them.

You’re going to need:

  •  A couple large mixing bowls
  • A mixer (unless you’re crazy and want to do this by hand)
  • A large spoon
  • An oven heated at 350 degrees
  • Either a 13X9  cake pan
  • OR two 8 or 9 inch round pans
  • A little bit of shortening
  • A tiny bit of flour

As well as:

  • 1 1/2 cups granulated sugar1 cup vegetable oil
  • 3 eggs
  • 2 cups all-purpose flour
  • 2 teaspoons ground cinnamon
  • 1 teaspoon baking soda
  • 1 teaspoon vanilla
  • 1/2 teaspoon salt
  • 3 cups shredded carrots
  • 1 cup chopped pecans or walnuts

and to frost it you’ll need

  • 1 package (8 oz) cream cheese, softened
  • 1/4 cup butter or margarine, softened
  • 2 to 3 teaspoons milk
  • 1 teaspoon vanilla
  • 4 cups powdered sugar

 Now that you have everything needed, I’ll tell you just want to do with it.

If you read this from the start, your oven should already be preheating to 350 degrees. If not, do that now.

Grease the bottom and sides of the pan(s) with shortening and lightly flour them.

Get one of those large bowls and your mixer and beat the granulated sugar, oil and eggs on low for about 30 seconds or until its well blended.

To that, add the flour, cinnamon, baking soda, 1 teaspoon vanilla and the salt; beat on low 1 minute.

Stir in the carrots and the nuts. STIR, with the large spoon I mentioned earlier.

Pour your batter into the pan(s).

If you used a 13×9-inch pan you’ll want to bake it 40 to 45 minutes.

If you used the round pans, bake them 30 to 35 minutes

Either way, you want to bake them till a toothpick inserted in the center comes out clean.

Once baked, let them cool completely. You can cool the 13X9 in the pan or on a cooling rack. Cool the rounds about 10 minutes in the pan then remove them and let them finish cooling on a rack. It should take about an hour.

While that’s cooling you should probably make the icing so get the other mixing bowl and your mixer back out, or cleaned off.

You’ll want to beat the cream cheese, butter, milk and vanilla on low until its smooth. Gradually mix in the powdered sugar. Gradually… like 1 cup at a time. Your mixer should still be on low so just keep it going till its smooth and spreadable.

Since that didn’t take an hour let your cake(s) finish cooling.

Now you can frost the 13X9 or fill and frost the rounds.

 If by chance you have leftovers, store them in your fridge or invite me over.

Shannon is a 30-something Mom to 5 beautiful children. Yes, 5! You could call it a modern day version of yours, mine, and ours. Her blended family of 7 keeps her on her toes and on the go. Add in working from home as a legal secretary and quickly you’ll see her life is crazy and often chaotic, but she wouldn’t trade one sarcastic moment of it. Her blog, Still Seeking Martha is just a place she goes to share the ups & downs of blended mommyhood, like mowing what feels like 127 acres with a push mower, favorite foods and recipes, mostly cake, and sometimes some DIY projects like great teaching tools. You can stalk Shannon at http://stillseekingmartha.blogspot.com, on Facebook, Twitter, or just email her at seekingmartha@gmail.com.

General Tso’s Chicken {Foodie Friday}

General Tso’s Chicken {Foodie Friday}
Written by Sarah of East9thStreet.

This weekend my step-son is visiting from Tulsa.  He’s a typical teenage boy and typically eats burgers and fries.  Recently he’s become a huge fan of Asian food so we decided this would be the perfect weekend to try out some new recipes.

Browsing some of the foodie blogs, I came across a recipe from Far Away.  Having the majority of the ingredients on hand, I decided it was time to attempt General Tso’s Chicken.

This version of General Tso’s Chicken is sure to challenge even your favorite take-out restaurants versions.  The ingredients merry well together and there is just the right amount of heat.  My only deviation from this recipe was not using the dry, white sherry to marinate the chicken.  Instead I used rice wine vinegar only because I couldn’t find white sherry.  I hope you enjoy this and it becomes a regular in your dinner rotation.

General Tso’s Chicken

Ingredients

  • ¼ cup chicken stock
  • 1 tbsp soy sauce
  • 1 tbsp rice wine vinegar
  • 2 tbsp hoison sauce
  • 2 tsp Sriracha sauce (I’m not a huge fan of spicy and I could have easily added another tsp)
  • 2 tsp sesame oil
  • 3 tbsp sugar
  • 1/3 cup + 2 tsp cornstarch, divided
  • 1 lb boneless, skinless chicken breasts cut in 1-in pieces
  • 2 tbsp dry white sherry (or substitute rice wine vinegar like I did)
  • 1 tsp fresh ginger, grated
  • 6 dried red chilis
  • 3 green onions, white and green parts cut into ½” pieces

Directions

  1. In a medium bowl, combine all the ingredients up to the cornstarch.  Add the 2 tsp of cornstarch and whisk until well blended.
  2. In a large bowl, marinate your chicken for 15 minutes in the dry white sherry or rice wine vinegar.  Add a sprinkle of salt.
  3. This step is important.  Because you want your cornstarch mixture to be a dry coating on the chicken, put the chicken in a colander and drain any excess liquid.
  4. Using the 1/3 cup of cornstarch (use more if your chicken seems wet), coat the chicken.  In a large skillet, warm the peanut oil over medium heat (my oil wasn’t very deep, just enough to cover the surface of the pan) and once hot, add chicken and brown the chicken on all sides.  Once the chicken is done, remove it from the pan and set aside.
  5. Drain any leftover oil out of the skillet and add garlic and ginger, cooking for 20 seconds or so.  Add chilis, chicken and green onions, mix gently.  Add the sauce mixture and stir frequently until the sauce thickens and coats the chicken.  Because of the cornstarch in your sauce mixture, this happens fairly quickly so watch your food!
  6. Top with sliced green onions and serve over a bed of rice.


When not chasing toddlers, planning playdates or studying to be the most awesome healthcare administrator in the world, Sarah runs the family blog, East9thStreet.  There you’ll find amazing recipes, tips and tricks on surviving parenthood and an occasional random rant.


Eating for Pleasure {New Year, New You}

Written by ARWB January 2012 Blogger of the Month, Lyndi Fultz of NWAFoodie.

As this new year broadcasts its frantic message of resolutions and fervent hopes for tomorrow, twitter and the blogosphere is abuzz with diet tips, calorie counters, and an overall confusion of diet, diet, diet, and denial.

A healthy diet doesn’t have to mean denial.

A healthy diet should mean eating for pleasure.

First, let’s talk about the word “pleasure.”  Webster defines “pleasure” as desire, inclination; a state of gratification; sensual gratification; frivolous amusement; a source of delight or joy. 

These are strong and healthy phrases.  Pause and dwell on them.

When we talk about eating for pleasure, it means that we should not focus on the guilt of eating.  Eating is a privilege and should be a source of delight or joy for us.

It’s all about mindset.

Sometimes we just need a little tweak or reminder of our priorities!

The RIGHT mindset when eating

1)     Slow down.
2)     Engage all of your senses.
3)     Consume half of what is on your plate.
4)     Savor by taking time to chew.
5)     Give thanks.

The WRONG mindset when eating

1)     Fret about calories.
2)     Fret about fat grams.
3)     Don’t pay attention to what just went into your mouth.
4)     Shove.
5)     Regret another dissatisfied meal.

Let’s face it.  We all have gone down the wrong mindset path a time or two.  But that’s okay because that was yesterday.  Today we start anew…

Which would you rather choose?

Eat well, my friends.  Eat well.

Lyndi

Lyndi of NWAFoodie is a girl who just happens to live in beautiful Northwest Arkansas. Much of her blogging inspiration comes from this gem of a place which she refers to as the proverbial land of milk-and-honey.

Gluten Freedom {New Year, New You}

My name is Dana, and I am the author and creator of Gluten Freedom.  I am a student at the University of Arkansas, a substitute teacher, a wife, a blogger, and will soon be a certified early childhood educator.  I live in Fayetteville, and you can find me calling the hogs at football, basketball, and baseball games!  PIG SOOIE!
As I think back to this time last year, when 2011 was fresh and new, I realize how much my life has changed.  I have lost thirty pounds.  I have started a new blog.  And I have been diagnosed with celiac disease.  So bring it on, 2012!  I am ready for anything!


For those of you not familiar with celiac disease, I will give you the basics:
Celiac disease –  an autoimmune digestive disease that damages the villi of the small intestine and interferes with absorption of nutrients from food. What does this mean? Essentially the body is attacking itself every time a person with celiac consumes gluten (National Foundation for Celiac Awareness)


Cooking, eating out, traveling, and holiday get-togethers are just a few of the things that I used to love doing and have had to completely overhaul.  I was diagnosed two days before Thanksgiving, and with no time to learn or prepare, I found myself eating only turkey, turkey, and more turkey.  I even had to check the label on the bird!


Here are some of the symptoms of celiac disease, but please be aware that the symptoms are a mile long, and this is just a list of some of the common complaints:
  • abdominal pain and bloating
  • diarrhea
  • anemia
  • gastric ulcers
  • Crohns disease
  • skin rash
  • muscle cramps
  • osteoperosis
  • depression
  • malabsorption
  • bruising

I also have some great resources for you to check out if you have, or think you might have, celiac disease!

National Foundation for Celiac Awareness

Center for Celiac Research at The University of Maryland

I have found, through blogging, that there are people everywhere facing this, and although it can be frustrating, resources, friends, and supporters are around every corner!  If you or someone you know is going through life changes due to celiac disease, or a gluten or wheat allergy, come by and visit me in my gluten free world!  In the meantime, here is a recipe that I have embraced in my gluten free lifestyle!

GLUTEN FREE HAM AND CHEESE QUICHES

3 eggs, slightly beaten
1/2 cup milk
4 ounces shredded cheese
1 tbsp minced dry onion
1/4 tsp thyme
1/8 tsp salt
1/4 tsp pepper
3/4 cups diced ham

*AS ALWAYS, CHECK INDIVIDUAL PRODUCT LABELS TO ENSURE EACH INGREDIENT IS GLUTEN FREE*

1) Preheat oven to 350 degrees and spray muffin tin with non-stick canola oil spray.
2)  Combine all ingredients besides ham.
3)  Spoon 1-2 tablespoons into each muffin cup.
4) Sprinkle ham evenly on top of each muffin cup of mixture.
5)  Bake for 25-30 minutes, or until knife inserted comes out clean.
6)  Broil for 2-4 minutes to brown tops of quiches.
7)  Serve and enjoy!


New Year, New You is the Arkansas Women Bloggers topic of the month for January 2012.  If you have a story to share with our readers please check out our Guest Post Guidelines and contact julie@arkansaswomenbloggers.com.

Wassail, wassail all over the town! {Foodie Friday}

“Our bread it is white and our ale it is brown…” Ok, I’ll stop. In case you’re wondering, those are the words from the traditional English Gloucestershire Wassail song. Come on, indulge me, you’ve got a minute to explore that link and the background on wassail!

Gloucestershire Wassail (on Youtube)

Apparently, my high school years of performing in a Madrigal dinner had quite an effect, and now those around me must also endure it. If you don’t feel like delving in, here’s the gist of it: today’s definition of a madrigal dinner is a multi-course, Medieval-style meal served by costumed performers singing traditional (old English) Christmas carols. (“The boar’s head, in hand bear I…” Ok, sorry – I’ll really stop this time.)

So, why does this matter on foodie Friday? Because wassail (literally “waes hael” or “be you healthy”)  is a foodie tradition you should most definitely explore! Before we go further, though, I need to offer my standard disclaimer from The Food Adventuress: I’m quite horrible at precisely following directions and tend to just do whatever I want in the kitchen and wait to see how it turns out. So, if you’d like a real recipe for wassail, you’d best go elsewhere. Just do a quick search on the Interweb and you’re sure to turn up lots of lovely options. Now, don’t tell my Mom, but here’s what I do:

  1. Grab crock pot a little too late in the day for 6 p.m. wassail readiness.
  2. Have a glass of wine or your relaxing beverage of choice.
  3. Recollect that you were going to make wassail and get back to it.
  4. Fill said crock pot about 2/3 full of apple cider.
  5. Top it off with generous pours* of orange juice (I like pulpey for this!) and pineapple juice.
  6. Add a good amount** of lemon juice and honey.
  7. Start adding spices to your taste. I choose cinnamon (lots!***), ground cloves, freshly grated nutmeg and sometimes ginger and allspice depending on my mood/desire to exert myself.
  8. Decorate your wassail. I typically add a cloved orange (sliced or not, per your own desire to exert yourself) and some apple slices from near the core along with a cinnamon stick or two.
  9. Let simmer for several hours and return to your aforementioned beverage.
  10. Serve to standing ovation (or at least a few compliments).

* In this case, generous pours mean probably a cup or two each, but let’s not get too precise.

** Under duress, I would probably estimate that a good amount means half a cup?

*** I’m pretty sure my favorite measurement is “to taste.” That’s what you do here – you won’t mess up!

A couple of notes that will increase your cool factor: first, everybody has a scratchy throat around the holidays. Wassail is the guaranteed fix-it and soother – offer it to everyone who enters your home. Of course, your home smells completely fabulous because you made wassail! Also, I recommend not adding alcohol. Shocking, I know. Wassail is enjoyable by all… the kids and those who abstain should enjoy it as much as everyone else, and anyone who wishes to doctor (ahem) their drink may do so with ease once in the mug.

Finally (insider tip!) just store the wassail outside between servings, assuming it is even mildly chilly at night in your neck of the woods of Arkansas (and beyond). Just slowly warm it up starting a little earlier on subsequent serving days. The wassail gets a little thicker as the spices mull, so just add some more of the juices prior to simmering and the original batch should get you through several servings.

Again, this is all highly unscientific but fairly popular Chez Stephens, and it’s standard fare throughout the month of December from tree-decorating through New Year’s. I hope you’ll try it, and maybe add a few of the old English carols to spice up your holiday tunes as well! Give some background to your family and your kids may be the smartest ones on the block. Mine is definitely the one who knows about wassail, which either makes her incredibly cool or highly nerdy. I’m ok with both.

Happy Wassailing to you!

Beth is the marketing maven and one of the four founding members of Arkansas Women Bloggers, but her real job is as executive director of the Ozark Natural Science Center – a nonprofit field science, environmental education, camp and conference facility in northwest Arkansas. She blogs over at The Little Magpie and The Food Adventuress and finds herself eating far more of her mother’s rum cake around the holidays than she would care to admit.

Please note: all images and links are public domain from the web, and used only to illustrate topics for your personal use.