Author: Debbie

Shana Chaplin: Perfect Pork Tenderloin Straight from the Grill

 shana pork tenderloin 4

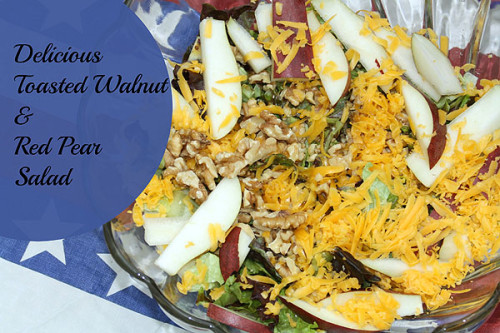
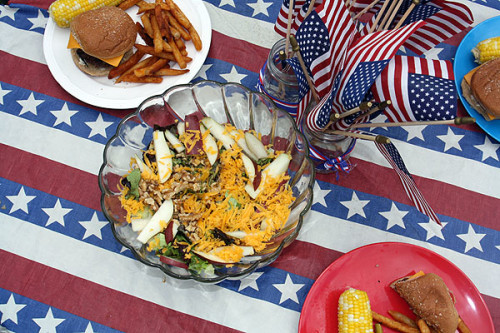
Pork Tenderloin is a perfect cut of meat for grilling.  With the right marinade and low heat, you get a tender, tasty piece of meat every time.  This recipe is one of my “go to” recipes for any time of year.

shana pork tenderloin 3

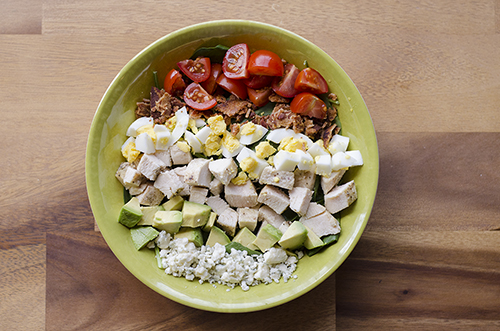
I love this recipe for several reasons.  It is easy, virtually fail proof, can be served hot off the grill or cold, and works year round.  I usually serve the tenderloin with green beans and potato casserole or cheese grits.  The leftovers can be chopped and stored for making barbeque pork sandwiches.  That is if you have leftovers!

shana pork tenderloin 1

Perfect Pork Tenderloin Straight From the Grill
Serves 8
Write a review
Print
Ingredients
  1. 1 package pork tenderloin
Marinade
  1. 1 cup of orange juice
  2. ¼ cup pineapple juice
  3. ½ cup lite soy sauce
  4. 2 tsp sesame oil
  5. 2 Tbsp minced garlic
  6. 1 tsp chili powder or ½ tsp chili pepper paste
Instructions
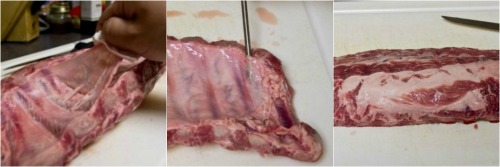
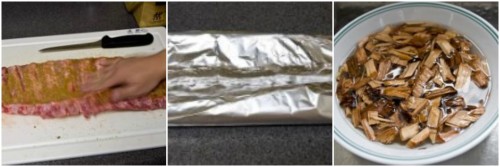
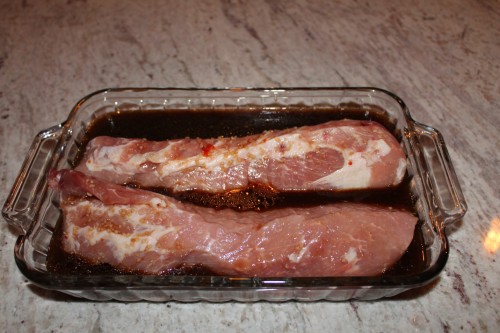
  1. Place the Pork Tenderloin in a 9 x 13 baking dish.
  2. Whisk together all of the marinade ingredients and pour over the pork tenderloin.
  3. Seal with plastic wrap and place in refrigerator overnight. At a minimum the tenderloin should marinate 4 hours to 6 hours.
Grilling the Pork Tenderloin
  1. Spray or brush the grill grate with oil.
  2. Preheat the grill to 350 degrees. You want to keep the grill between 300 and 350 the entire time.
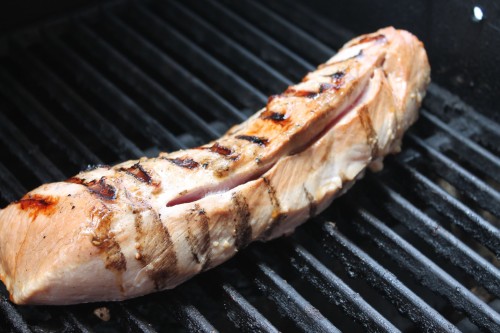
  3. Place the Pork Tenderloin on across the grate, reserving the marinade.
  4. Allow the tenderloin to SLOWLY cook.The key is in slow and low grilling. You will rotate the tenderloin at least 6 times during the grilling process. Each time you rotate the tenderloin coat it with marinade. It will take roughly 45 minutes to cook
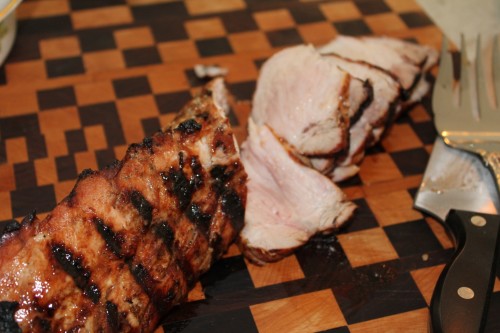
  5. The tenderloin will begin to have dark grill marks and turn a beautiful golden color.
  6. Turn the grill off and move the pork tenderloin to the upper rack. If you don’t have an upper rack place the tenderloin on a cookie sheet and let it sit in the oven (off) for 5-10 minutes. This step is important. This will allow the tenderloin to seal in all the yummy juices and finish cooking. The center will be slightly pink. Even if you overcook the tenderloin slightly, it will still be juicy and tender.
  7. After letting the tenderloin rest, place it on a cutting board and slice thinly. I like to cut mine in pieces ¼ inch to ½ inch. You can serve the tenderloin as is, or offer a side of barbeque sauce for your guests to drizzle over the top.
Notes
  1. If you have trouble finding a pre-packaged pork tenderloin , you can purchase a pork loin. Trim the excess fat. Cut the loin once across the grain, dividing it in half. Cut each half lengthwise with the grain. You will have 4 pork tenderloins. Freeze two or double the recipe.)
Arkansas Women Bloggers https://arkansaswomenbloggers.com/

shana chaplin Getting to Know Your ARWB Foodies

Shana Holloway Chaplin
Simple Organized Life
SOS Organizing Company

What food reminds you of childhood?
Rice is a primary for me. I grew up in Japan. I love it steamed, with curry, covered in teriyaki beef or with dried seaweed. Both sides of my family have a real sweet tooth. I love desserts as well. Meringue pies, anything chocolate and fresh homemade cakes remind me of both sets of grandmothers and my great-grandmother.

What is your favorite international cuisine?
Asian. Although, Italian runs a close second. I love the freshness of Asian cuisine, and as mentioned love me some good steamed rice. None of that Minute Maid Rice stuff. Rice cooked in a pressure cooker. I love the seasonings of Asian, the ease of preparation and the use of lots of vegetables. What is always in your refrigerator at home?

What is always in your refrigerator at home?
Eggs, butter, kale or spinach and apples.

What is your most used cookbook?
Southern Living Cookbook 

What is your favorite food meal to cook at home?
Italian Sausage Tortellini Au Gratin.  It is my go to meal.  I can easily make a double batch and freeze half.  I keep dishes of it prepared to take to sick friends or families with new babies.  Always a hit.  Good comfort food.

What is your go-to ingredient that you use all of the time?
 Parmesan and fire roasted tomatoes.

What is a cooking tip that you would like to share with beginning cooks?
 Just do it.  Really good cooking is often simple.  Don’t overthink it.  Relax and enjoy the process.  I think any dish, made at home and served around the dinner table tastes better than any 5 course meal at a restaurant. 

When you’re not cooking, what are your favorite pastimes?
I love to decorate our home, which means I love digging around flea markets and browsing through Pinterest.  I also love to read and find myself drawn to devotional type books or Southern writers.

What else would you like us to know about you?
I am a wife, mom, caretaker of aging parents and manage two businesses.  I make it a priority for my family to eat at home around the dinner table at least 4 times per week, and most weeks 5 times.  It IS possible.  I truly believe cooking at home, sharing hospitality with my family and friends is the core of who I am.  I also believe it has had the largest impact on my girls over many other things we chose to do.  They count on meals at home.  They share with us around the table.  They bring their friends to our table.  For me, the dinner table is where memories are made.

Connect with Shana:
Facebook
Pinterest

Shana blogs at “Simplified Organized Styled”, focusing on living a beautiful life with purpose.  She is a former missionary kid, wife to Paul Chaplin, and mother to teenage twin daughters, Emery and Lindsey.  She and her family reside in Maumelle.  Shana manages an organizing and personal coaching business (SOS: Simplified, Organized, Styled), home schools, serves alongside her husband in young married ministry at Immanuel Baptist Church, volunteers through the Arkansas Baptist State Convention Women’s Missionary Union Board and Women’s Ministry program.   


#AWBU 2014 Recap: Creative Food Photography

By Heather Disarro

(Nate from Debbie: For those of you who missed last year’s AWBU Foodie Friday, here’s a little hint of one of the sessions coming up for 2015.  We’re so excited to have Heather expanding her Food Photography and Food Styling session; she will be assisted by Sarah Shotts, Jenny Marrs and Whitney Binzel, skilled photographers themselves.  Now, isn’t it about time you turned in your registration for AWBU 2015 including Foodie Friday?)

Session Title: Creative Food Photography: Branding Yourself with Gorgeously Designed Food Photos

Hey y’all! My name is Heather and I’m the proud owner of the blog Heather’s Dish, a place where I create recipes and talk to y’all like we’ve been friends forever. It’s simple: I’m a wife, mother, and full-time food blogger. I do all of it imperfectly, but since I believe it’s our imperfections that attract other people to us I’m OK with sharing that. And here’s the thing about food photography: it can be SUPER intimidating (has anyone SEEN Pinterest lately?!) but the thing is that we all have a story to tell. We all have a unique perspective to share, so there’s room at the proverbial table for all of us!

Because we are such a visually-driven society it’s important to take the time to set up our photos to tell our story so that we can set ourselves apart. The first thing to do is find a camera you love and learn how to use it! This means look up videos and tutorials, be an A+ student, and practice. Realize that you’ll likely never get that one photo that you consider absolutely perfect, but then again it’s that search for that one photo that keeps us going. Practice and be willing to make mistakes!

Something to consider when you’re shooting is consistency. If someone ran across your photo on Facebook or Pinterest, would they know it was yours based on the quality and consistency of the photo? Or even just looking for consistent lighting – try shooting at the same time of day with the same kind of light (Northern light is always the most consistent!). And create a consistent editing routine – it will make the whole post-processing thing much simpler!

My husband is super smart and knows all of the things about lighting setups and products to usebut I am a purist at heart and only ever shoot using natural light. It’s the most beautiful to me and always highlights the food best, plus the evenness of the light is perfect for casting the light across the food in a beautiful way. And yes it can be fickle (time changes, weather, etc) but I believe it’s worth it to wait for the good light than to shoot using anything else.

Because I’m a list person I‘m going to give y’all a bullet point list of the highlights of this presentation (and lucky you – no nervous laughter from me!):

  • Styling food requires utilizing texture. That means fresh food might look great with a quick mist of water, cooked food usually works best without too much steam (so let it cool slightly), and a final plating looks great with a few fresh ingredients in the shot as well. Don’t be afraid to change it up!
  • Styling props and accessories are SUPER important! Find things that really portray the kind of food you cook (homestyle? restaurant-quality? simple? colorful?) Keep in mind that you don’t want to overwhelm the actual food with bright colors and too-bold patterns. And just an FYI – red can be very hard to photograph.
  • Play with lighting angles! Shoot the food with the light directly at the subject, from the side, or with the light coming from behind. All of those options can create really great texture.
  • Play with other angles! Shoot the food from the ground level, a 45-degree angle or overhead to create different stories with your shots.
  • Basic editing can be done with Lightroom (highly recommend), Photoshop, or various online resources. I use Lightroom almost exclusively, but will resize things as necessary in Photoshop. All of these options have really great online tutorials and you can Google anything you want to know.
  • A note on sizing: vertical (portrait) photos are usually work best for Pinterest, Google+, StumbleUpon and are easily cropped if you’re reposting to Instagram. Horizontal (landscape) photos are usually best for Facebook and Twitter, but are also responsible for increased viewability if you work with an ad network who has those requirements.

In short, be prepared to make mistakes. Be prepared to get frustrated. But in the end be prepared to fall in love with photography and eventually develop a really keen eye for great photos!

Heather Disarro_1_Lowres2


Heather Disarro is a food-centric lifestyle blogger who is passionate about embracing the beauty that surrounds us with in our everyday lives. She is a Texan living the expat life in central Arkansas with her husband, son and two massive dogs. Heather writes her blog, Heather’s Dish, from an office filled with dust, dog fur, toys and plenty of love, grace and music. She specializes in creating delicious and creatively nourishing recipes. Cooking seasonally and with as many local ingredients as possible is an important component to Heather’s style of food, and she revels in the opportunity to bring the love of cooking to the world as a way to love others well! You can find her on her blog, Facebook, Twitter, Pinterest, Google+ and Instagram.

Chris Olsen: Grilling Baby Back Ribs {Foodie Friday}

chris olsen photo 250


This week’s Foodie Friday guest is Chris H. Olsen a nationally known home and garden guru, designer, author, TV personality, public speaker and friend of ARWBIn his book, Chris shares his landscape and gardening knowledge along with his unique flair for home decor and design. He is also a member of the Association of Professional Landscape Designers


This recipe is more of a method than a firm step-by-step because there’s a lot of flexibility when it comes to barbecuing ribs.

Before we start, you’ll need pork ribs. Baby back ribs come from the loin of the hog and the bones are generally smaller and the flesh is leaner and meatier than spare ribs which come from the side and belly.

You’ll also need a dry rub. I like using the rub I use for my Grilled Pork Chops.  For glazing, a barbecue sauce is needed. (Nate from Debbie: Hubby uses a rib rub from Cookshack.)

Wood chips (hickory or mesquite both work really well) are also needed. Part of what makes barbecue ribs authentic is the taste of smoke permeating the meat. Since the ribs cook in just a couple hours, the smokiness will be fairly mild.

chris olsen Collage

The night before you plan on barbecuing, prepare your pork ribs. Working with one rack at a time, lay the rack on a large cutting board. You’ll want to trim off any excess meat because they won’t cook at the same rate as the rib meat. Usually baby back ribs don’t come with any extra flaps of meat, but spare ribs, St. Louis style and country style ribs often do.

Flip the rack over so the meaty side is face down. There is a thin membrane on this side that goes over all the bones. Removing this membrane is optional, but generally a good idea. It can become a very tough sheet that tastes and feels like you’re chewing on plastic if you cook it with the ribs. To remove it, just thrust a blunt object (like the blunt tip of a thermometer) in between the membrane and the bones as shown in the photo. Wiggling your tool around a little should give you enough room to get a finger beneath the membrane. Once you’ve got a grip on the membrane, pull it away from the back of the ribs. You’ll need to use some force, but if you’re smooth about it, the membrane should come away as one piece. Using a paper towel can help you grip the membrane better if your fingers keep slipping. 

Cover both sides of the rack with a generous portion of spice rub. I generally use about 1/2 cup of rub per rack of ribs. Make sure you use your hands to rub the mixture into the ribs. The moisture from the pork should be enough to make the rub stick and coat easily.

After both sides have been rubbed with the spice rub, place the rack onto a large sheet of heavy duty aluminum foil. The foil should be large enough to wrap the entire rack in it (just image you’re going to gift wrap the ribs).

Fold the foil over the ribs and fold the aluminum foil onto itself to seal just like you would if you were preparing to freeze it.

Put them onto a sheet pan and slip it into the refrigerator so the rub can do its thing. We’ll want to leave the ribs in the fridge for at least 10-12 hours. The salt and sugar in the rub should draw out some moisture from the ribs which serve two purposes. First, it firms up the flesh a little bit, and, second, helps provide moisture to the rub which turns it into a paste and then a liquid. The liquidy rub penetrates into the meat during the next several hours, so it’s important to wait before cooking the ribs.
About an hour before you plan on cooking, soak 2 cups of wood chips in water for that hour.

Prepare a grill for indirect heat. For a charcoal grill, start a fire and move the coals to one side, leaving the other side without coals. For a gas grill, turn on the burners only on one side. (If your grill doesn’t have burners on just one side, then I suggest you rig up something so your ribs will be much higher up and away from the flames than they normally would be.) You’ll also need a rib rack (a metal device that looks like a desk top filing rack. Flip it over so the point of the V is facing up and stick it on the grill. That’s how I do it. Place the rack on the side of the grill without direct heat.

chris olsen 2 Collage

Remove the wood chips from the water. If you’ve got a charcoal fire going, put the wood chips directly onto the coals where they should begin to smolder. If you’re using a gas grill, place the wood chips into a smoker box (or an aluminum foil sheet shaped into a box with holes punched in the top like the one in the picture) and put it on the side where the flames are on. Turn the fire up until the chips begin to smoke and then turn the heat down to low

Remove the ribs from the refrigerator and unwrap them. If the racks are too long to fit on the rib rack on your grill, then you might have to cut them in half. Insert the racks or half racks into the rib rack so they are standing up. Position them so they are as far away from the heat source as possible. Close the lid.

Every twenty minutes, open the lid and rotate the ribs. Move each rack closer to the heat source, and then move the rack closest to the heat source to the position farthest from the heat.

After about 1-1/2 hours for baby back ribs or 2-1/2 hours for spare ribs, the meat should have shrunk away from the bone substantially. The temperature of the rib meat should be over 180°F which means much of the collagen in the meat has probably converted to juicy and unctuous gelatin (the reason we love ribs).

At this point, pull the racks off the grill and clear off the smoker box and rib rack. Redistribute the heat so it is even throughout the grill (for gas grills, use medium heat). Place the racks of ribs back onto the grill and brush on your favorite barbecue sauce. Every three minutes, flip the racks and brush more sauce on. Repeat until you’re tired, have run out of sauce, or can’t wait any longer.

Cut the ribs apart to serve. 

That’s it. Follow these steps correctly and you should have some great barbecue ribs.

Getting to Know Your ARWB Foodies

Chris H. Olsen
Living the Good Life with Chris H. Olsen

What food reminds you of childhood?

Cake! My grandma would make a wonderful strawberry cake for me for my birthday!! It’s still my favorite!

What is your favorite international cuisine?
. I LOVE Mexican food!!! I spent a LOT of time in Southern California and that just became my favorite food when I would eat out! I love to experiment with lots of different recipes!

What is always in your refrigerator at home?
I ALWAYS have cheese, raisins and milk!

What is your most used cookbook?
I don’t use a cookbook! I cook from my heart!

What is your favorite kitchen gadget?
. My wine bottle opener…lol! No..I really don’t use “gadgets”. I’m kind of an “old fashioned” cook, so I do my own chopping, cutting. I don’t really get all fancy! I like to keep it simple and easy!

Do you have a favorite food indulgence?  
CHOCOLATE!

What is your go-to ingredient that you use time and time again?
Peppers! Peppers and onions! Oh…and fresh rosemary from my yard!

What is your favorite food meal to cook at home?
I love to make homemade chili!

What is a cooking tip that you would like to share with beginning cooks?
. Don’t be afraid to just get in there and try it! No one succeeds the first time, so keep at it!

When you’re not cooking, what are your favorite pastimes?
Gardening, working in my two nurseries, Botanica Gardens and Plantopia and speaking to groups around the country!

What else would you like us to know about you?
I love to try new things and I don’t think that anything is ever a failure! Being positive is the key to success in life and in business!

Connect with Chris::
Twitter: @ChrisHOlsen
Facebook

Chris H. Olsen
Botanica Gardens
Plantopia


Amanda Farris: Toasted Walnut and Red Pear Salad {Foodie Friday}

toastedwalnutsalad

Its Sweet Summer Time!

We have already been enjoying lots of summer food, my favorite being grilled corn on the cob and homemade ice cream. But in the summer, we also enjoy lots of fresh salads especially this favorite, Toasted Walnut and Red Pear salad.  When I say favorite, I mean you will catch me in the kitchen with a fork and the big salad bowl cleaning up any last bit of it I can before I wash the bowl.

IMG_8985

 My mother in law first shared this recipe with me a couple of summers, and continues to tease me about how much I like it. I think I ate three helpings the first time she served it to me. And now, I’ve adopted it as a staple recipe of my own to share with friends and family.

 It’s simple and you will love it!

IMG_8999

Homemade Ranch Dressing:

  • Hidden Valley Ranch Mix™ (Do like I do and get  it in a bulk size from Sam’s Club; it’s well worth it.
  • Mayonnaise (The real stuff.)
  • Milk

Just follow the directions on the back of the package. I know, you thought it was going to be an intense homemade secret recipe. Nope. But, I do promise, it tastes so different and so much better than the stuff that comes out of the bottle. 

Toasted Walnut and Red Pear Salad
Serves 4
Write a review
Print
Ingredients
  1. ½ cup- 1 cup toasted chopped walnuts (I lean on the 1 cup side, because I love the flavor.)
  2. 1head red leaf lettuce
  3. 2 red pears, sliced into wedges
  4. sharp Cheddar, grated
  5. homemade ranch dressing (I say homemade, because it’s all I like. But if you like the store bought, go for it. No harm done.)
Instructions
  1. Chop lettuce
  2. Top with red pears and walnuts.
  3. Sprinkle some sharp Cheddar cheese on top.
  4. Garnish with homemade ranch dressing.
Arkansas Women Bloggers https://arkansaswomenbloggers.com/
I know it sounds so simple and it is. But we love simple right? It makes life better.

But the flavor of the sharp cheese, toasted walnuts, and pears mixed together will have you running into the kitchen to whip up another batch of this salad to share with your family.

 Enjoy! 

Amanda Farris Embracing Grace

 Getting to KnoARWB Foodies
Follow the link to see what Amanda had to say.

Connect with Amanda:

 Amazing Grace and Living the Adventure

Instagram

Twitter

Shannon Magsam: Family Favorite Fruit Salad {Foodie Friday}

Fruit salad, nwaMotherlode

Just after Christmas last year, my parents sold their big, sprawling farmhouse and moved into a smaller place.

When I say their house, I really mean their home. It was a place my siblings and I — and our kids — all loved dearly. We might still be a little in shock that we don’t gather there for just-because weekends and holidays anymore.

We miss the pond for fishing and shooting fireworks over, the little dollhouse-like cabin where the grandkids played, the acres and acres for driving the Ranger.

I know my parents don’t miss the weed-eating, the mowing, the house upkeep, the pool upkeep, the upstairs/downstairs cleaning, et cetera. We know why it was necessary for our parents to sell the big house – and all the acreage — but I know I’m still in the mourning stage.

Since I live about three hours away, I haven’t had as much time to get used to the idea. I still picture my parents there at that house and it’s a little jarring every time I head to central Arkansas and we drive past the normal exit to go “home”.

But there is something that’s helping with the transition: family recipes.

Even though my parents aren’t at that particular place anymore, we can still go “home” when we’re all together, gathered around a dinner table that’s laden with certain foods like my mother’s turkey and dressing (she makes it year-round) or steak with lemon pepper or fried chicken (like only my mama can make).

And for dessert, maybe it will be just-out-of-the-oven oatmeal cookies, just-out-of-the-fridge cherry cheesecake, or tart lemon pie (my daddy’s favorite). Another crowd-pleaser dessert is my family’s fruit salad recipe. My mom, sister and sisters-in-law all love this one. It has lots of ingredients, but it’s easy to make. As always, just leave out anything you don’t like – and add more of what you do! {My husband doesn’t like coconut or pecans, so I left those items out of my latest batch.}

fruit salad shannon m foodie friday

Family Favorite Fruit Salad
Write a review
Print
Ingredients
  1. 1 cup coconut flakes
  2. 1 cup chopped pecans (or your favorite nut)
  3. 1 cup mini marshmallows
  4. 1 cup red grapes, halved
  5. 1 - 1 1/2 cups bananas, sliced
  6. 2 cups maraschino cherries
  7. 1 large apple, peeled/diced
  8. 2 small cans mandarin oranges
  9. 1 container Cool Whip
  10. 16 ounces cream cheese, at room temperature
  11. 8 ounces sour cream
  12. 1/4 cup lemon juice
  13. 1/4 cup white sugar
Directions
  1. In a medium bowl, combine the lemon juice, sour cream, cream cheese and sugar. Mix {very} well. In a separate, larger bowl, gently combine coconut, pecans, apples, mandarin oranges, mini marshmallows, red grapes, bananas and cherries together.
  2. Add the fruit mixture to the lemon juice mixture and gently combine all ingredients. Lastly, fold in the whipped cream.
  3. Chill for at least one hour before serving.
  4. Serve garnished with extra cherries and chopped pecans on top.
Arkansas Women Bloggers https://arkansaswomenbloggers.com/

Shannon in peach


 Getting to Know Your ARWB Foodies

Shannon Magsam
NWAMotherlode

What food reminds you of childhood?
Probably my mother’s homemade oatmeal cookies. She always seemed to have those ingredients on hand when we were all craving something sweet after dinner.

What is your favorite international cuisine?
I’m in love with pizza of all shapes, sizes and flavors. I’m always in the mood for pizza 🙂

What is always in your refrigerator at home?
Sharp cheddar cheese, 1% milk for my morning hot tea, grapes, leafy greens for a salad, fresh eggs from my backyard chickens, and bacon.

What is your most used cookbook?
“We Gather Together” from the First United Presbyterian Church in Fayetteville. I used to write a feature for the Arkansas Democrat-Gazette called “Classy Cook” and one of my classy cooks, Elizabeth Lear, gave it to me.

What is your favorite kitchen gadget?
Probably my garlic press. It gives me great satisfaction to use.

Do you have a favorite food indulgence?  
My guilty pleasure is a sugarcookie and chocolate milk while leafing through books at the Barnes & Noble cafe.

What is your go-to ingredient that you use time and time again?
Cheese. Cheddar, cream, mozzarella, parmesan, bleu.

What is your favorite food meal to cook at home?
My favorite is Creamy Tomato Fettuccine (except I use bowtie pasta) and a stacked salad.

What is a cooking tip that you would like to share with beginning cooks?
Even peoplewhocook a lot sometimes make huge mistakes in the kitchen (they burn something, they accidentally leave out ingredients, the meal tastes just meh). In fact, the more you cook, the more mistakes you’ll make. But the more you cook, the more you’ll improve, too!

When you’re not cooking, what are your favorite pastimes?
Writing, reading, eating out, walking my poodle, hanging out with my husband and daughter.

What else would you like us to know about you?
That I love the Arkansas Women Bloggers community! Each blogger represents a special ingredient that makes the whole recipe even more delicious! (OK, that’s cheesy, but you know how much I like cheese.)

Connect with Shannon:
Facebook
Twitter
Instagram

Shannon Magsam is co-founder of nwaMotherlode.com, a website for mamas in Northwest Arkansas, and NWA Mom Prom, the ultimate girls’ night out. Shannon also moonlights as a freelance writer and PR specialist for a Fayetteville-based global firm. She was previously a newspaper reporter covering a broad range of topics, including crime, courts, business, education and food. Shannon and her husband, John, are lovin’ life with their 12-year-old daughter, three chickens, two cats, and 1 standard poodle.

Sarah Shotts: California Cobb Salad {Foodie Friday }

Most of my favorite recipes are tied to a certain time in my life. Eating them is just as much about the memories as the food. A bite of chicken dumplin’s can take me back to a cold February gathered around Mamaw’s crockpot. Tomato juice dripping down my hand from my tinga tostada transports me back to my summer studying abroad in Mexico. And California Cobb salad was my first taste of freedom.

CaliforniaCobb-1 sarah shotts

I was living away from my family for the first time completing a theatre internship in Washington D.C. My little foodie soul was soaking up all of the different cuisine (ranging far beyond the standard southern soul food I grew up on in Mississippi.) I was also exposed to a vibrant community of healthy eaters and learned that food could be good for you and delicious at the same time.

 One of my favorite places to drop by for lunch was a salad chain called “Chop’t”. (We seriously need one here in Arkansas. Someone start a petition.) They served almost any kind of salad you could imagine. My favorite was the California Cobb.

 I love making my own version with leftovers so it’s easy to assemble with minimal cook time.


CaliforniaCobb-2 (1)


California Cobb Salad
Serves 2
Write a review
Print
Prep Time
10 min
Prep Time
10 min
Ingredients
  1. 2 cups spinach, chopped
  2. 2 precooked chicken breasts, diced
  3. 2 hard cooked eggs, diced
  4. 1 fresh tomato, diced
  5. 1 avocado, diced
  6. 2 strips precooked Petit Jean Bacon
  7. Crumbled blue cheese (to taste)
  8. Creamy salad dressing (like Ranch or Tzatziki)
  9. Pita Bread
Instructions
  1. Chop spinach.
  2. Dice chicken, eggs, tomato and avocado.
  3. Crumble Petit Jean Meats bacon.
  4. Assemble toppings on bed of spinach. Add blue cheese to taste.
  5. Top with a creamy salad dressing of your choice. You could use ranch or add a splash of milk to your favorite tzatziki recipe to make that into dressing.
  6. Pop pita bread in the microwave for a few seconds (wrapped in a damp paper towel) to make it nice and warm. Quarter and serve with salad.
Notes
  1. Optional: I went the “pretty” styling route for this photoshoot, but to be honest this isn’t how I usually assemble my salad. I love to toss the whole salad in dressing before serving so there’s a little bit of everything in each bite. After all, that’s how they do it at Chop’t. 😉
Arkansas Women Bloggers https://arkansaswomenbloggers.com/

sarahshotts-200x200


Getting to Know Your ARWB Foodies

Sarah Shotts

Love Letter to Adventure

What food reminds you of childhood?

Cranberry Orange Relish. Every holiday season my sister and I would stand shoulder to shoulder on the kitchen stool as we made this by hand with our mother.

What is your favorite international cuisine?
Tinga. I had the opportunity to study abroad in Mexico for my last semester in undergrad. We lived with families and our madre was an excellent cook!  My favorite dish there was Tinga… a tomato &ch

ipotle s

hredded chicken served on tostadas with blackrefried beans, crema, and fresh avocado.

What is always in your refrigerator at home?.
Milk for tea. 😉

What is your most used cookbook?
Pioneer Woman Cooks

What is your favorite kitchen gadget?
Granny Fork

Do you have a favorite food indulgence?  
Filling up on queso, chips & sweet tea before the food ever arrives at a Mexican restaurant.

What is your go-to ingredient that you use time and time again?
Avocado

What is your favorite food meal to cook at home?.
What I call my “Superhuman Breakfast” to start the day off right… steamed sweet potatoes & spinach, scrambled eggs & leek and horseradish sauerkraut.

 What is a cooking tip that you would like to share with beginning cooks?
To save time cooking with boiling water start the water off in the kettle first and pour the boiling water into a heated pot. (Learned this one from Jamie Oliver.)

When you’re not cooking, what are your favorite pastimes?
Reading, Traveling & Exploring NW Arkansas

What else would you like us to know about you?
I climbed the Pyramid of the Sun in a pair of black converse.


Connect Sarah:
Twitter
F

acebook
Instagram