When I was a kid, my parents had what I would consider a large garden sectioned off with railroad ties. My husband’s family had even more garden space with fruit trees and all kinds of plants.
When we got married, we had the goal of having a garden so we could grow flowers, some of our own food and just enjoy the nature of the whole thing.
Living in downtown Bentonville and renting for the first year of our marriage made this goal a tad difficult. I don’t think our landlord would have cared if we tilled up the ground but we didn’t think it was a great idea to put that much effort to build a plot at a place we didn’t own.
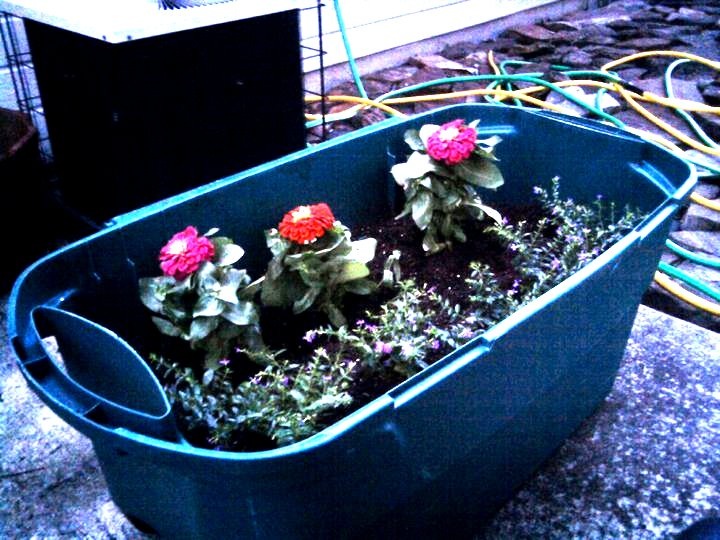
So we created a container garden. I’ve been asked before what that means and it is literally a garden in containers. You can use traditional pots and planters, or you can get creative and even cute. My goal is sometime to have a planter made from an old children’s play pool or a wheelbarrow just because it’s cute.
A container garden is also not just potted flowers—we had at one point blueberries, strawberries, corn, flowers, bell peppers and tomatoes. It was small, but it was ours. And you want to know something ironic? Since we moved into our own home two years ago we’ve been so busy that we’ve not planted a so-called “real” garden yet.
Why do a container garden?
We created a container garden because of where we live. Living in the city and lacking a yard is one reason to have a container garden.
I can see us having some form of a container garden even if we do an in-ground garden because I’m a person with a disability. People with mobility issues including seniors and people with disabilities can benefit from a raised garden bed or a container garden because it reduces (or completely gets rid of) the need to kneel on the ground. It seems like it would also be a fun way for families with kids to let their children take ownership of some of the plants
A container garden doesn’t force you to keep your garden in one location. So want to grow something that needs shade but also something that needs light? Use containers and place them in different parts of the yard. It also makes it easier for when you want to grow plants that require a different soil type than other plants.
You know another reason to do a container garden? It’s fun. It allows for creativity.
A few tips for a container garden
I don’t claim to be a gardener but we did learn a few things in our three years of having a container garden.
Always make sure there are holes in the bottom of the container. Even if you purchase planters designed for plants, check to make sure the drainage holes have been punched.
Most containers can be used including wheelbarrows, plastic pools, pails and even old storage containers (I had a giant green storage bin that had its lid break so we converted it to a planter).
Use nutrient-rich planting soil. It costs more than topsoil but it will protect your investment in the plants. However, if you have a large deep container, you can use the cheaper top soil to build up the base then use the nutrient-rich soil at the top where the plant roots actually are located.
Know what kind of soil the plants need and consider placing some plants together that can have similar or complementary needs. For example, we grew Roma tomatoes and blueberries together in the same planter. Something about their soil needs were complementary and they grew like gangbusters.
Do you have a container garden? What do you grow? Offer your tips in the comments!
Lemons, limes, and lavender – oh, my! What a world of options when you have these three delicious “from the farm” ingredients. Fresh ingredients are so important to tasty, healthy, and/or delicious recipes. These three small wonders have been in my thoughts since I knew the theme of this Foodie Friday post. What a delicious mindset!
The recipes started taking shape by looking at several websites and browsing some of my favorite cookbooks. Just looking at pictures of brightly-hued lemons, small, green perfect limes, and from the garden lavender made my mouth water in anticipation.
My in-laws were in town for Easter Sunday – and I knew my husband and his family mostly like lighter desserts. We were having a heavier meal, so I liked the purpose of lemons for the pie. Oh, delicious pie that it was! A lemon ice box pie. Surprisingly, I’d never made one before. Happy to my tummy! But, it took two tries. I don’t know where my brain was but I poured the entire pie into the pie shell and was just about to slide it gently into the oven, when I realized I had forgotten the sugar. Now, one tablespoon of sugar may not seem like a lot to even matter – but when you have lemons – you need sugar. So, I hesitantly sent my husband back to the store because you can’t have Easter Sunday meal with no dessert. Thankfully, he wanted the pie as much as I did and was all the more willing to go.
So, you would think by the time I came around to altering the lemon pie recipe to make a lime pie recipe I’d have it down and not make any mistakes, right? Wrong. First, I zested and juiced my limes, and then I dumped a whole egg into the bowl. Yep, I only needed yolks for this recipe. So, back to the store I went for more limes. (Note: I’m very glad in both Little Rock and Atlanta – where I now live, I’m very close to a Walmart or Kroger or Publix.) And a side note that I’m missing now living in Atlanta: Great Day Farm eggs. Oh, please, start shipping to Atlanta!
The flare for the lime pie was indeed the coconut whipped topping. Cool whip is a staple in our home, but real whipped cream, I dream in fluffy white goodness. And I adore cream of coconut (you know, the famed ingredient in the cocktail aisle). Just put some of this whipped cream in a bowl and hand me a spoon. Delicious!
Now, what to do about the lavender? My husband wonders where I come up with this stuff, but he was very glad I did in this case. Mini pound cakes, infused with a lavender simple syrup with a homemade buttercream (again, I could eat it by the spoonful) with the same simple syrup. Heavenly. My husband said it was the best buttercream I’ve made – and believe me, I’ve made many batches of it in the three years that we’ve known each other. He gets my vote for Most Encouraging Husband!
So, whether you want a pie or a cupcake – or just decide to go with a spoon and bowls of the whipped topping or buttercream, start your summer off right and try these recipes.
What are your favorite ways to use lemons, limes, and lavender? Please share recipes with all of us so we can enjoy the fruits of summer!
To that, add the eggs, sugar, and milk. Mix well. Pour into pie shell.
Cook for 10 minutes.
Let cool completely. Store in fridge overnight.
For garnish, whip the heavy cream and cream of coconut together until soft peaks forms. Spread on top of the pie
Sprinkle on the lime zest for a pretty presentation. (Another option if you had more time would be to toast some shaved coconut and use that as your garnish.)
By Kimberly Campbell of kd316
Arkansas Women Bloggers https://arkansaswomenbloggers.com/
Honey Lavender Vanilla Simple Syrup: (adapted from Bldg 25 Blog)
1 cup local honey (also has been known to help calm allergies)
1 cup water
1 vanilla bean (seeds scraped and keep the pod)
2 teaspoons culinary lavender buds
Mini Pound Cakes
1 cup sugar
1 ½ plus 1/8 cups all-purpose flour
1 1/4 teaspoons baking powder
1/3 teaspoon kosher salt
6 Tablespoons unsalted softened butter
½ cup plus 2 Tablespoons whole milk
1 1/2 teaspoons vanilla extract
2 large eggs
Buttercream
½ cup butter, very soft
1 ½ cup powdered sugar
2 ablespoons simple syrup (or to your taste)
Prepare the simple syrup
In a small sauce pan on medium heat, bring all ingredients to a boil.
Simmer for about 15 minutes until the syrup lightly coats the back of the spoon.
Using a small mesh strainer – pour the syrup through into a storage jar.
Store in fridge for a few weeks (if it lasts that long).
Cakes
Preheat the oven to 350 degrees and prepare cupcake pans with liners or nonstick spray.
For cupcakes (this recipe makes 12), combine dry ingredients in a mixer.
Put butter in and mix until the mixture looks like pebbly sand.
Add the wet ingredients, then add the eggs one at a time until well-incorporated.
Fill cupcake liners 2/3rd full and bake for 23 minutes at 350degrees.
Let cool completely. Or you can eat one right out of the oven if you so desire.
Once cooled, poke holes in the top of the cupcakes with a fork.
Drizzle simple syrup down through the holes.
Let sit for about an hour before frosting.
Buttercream
To make frosting, cream all ingredients until desired taste and texture.
Instead of using designer tips, I just cut the tip off of a small plastic sandwich bag. It works perfectly for me.
Frost the cupcakes.
If you have some lavender buds leftover, you can decorate the top of the mini cakes. If not, some pearled sugar toppings would be lovely as well.
By Kimberly Campbell of kd316
Adapted from 990 Square
Adapted from 990 Square
Arkansas Women Bloggers https://arkansaswomenbloggers.com/
Kimberly Campbell is a wife, a momma of two active boys and a creative. She enjoys cooking, photography, calligraphy, writing, and traveling. She and her fellas have just moved to Atlanta, Georgia where she will head up the Georgia Women Bloggers!
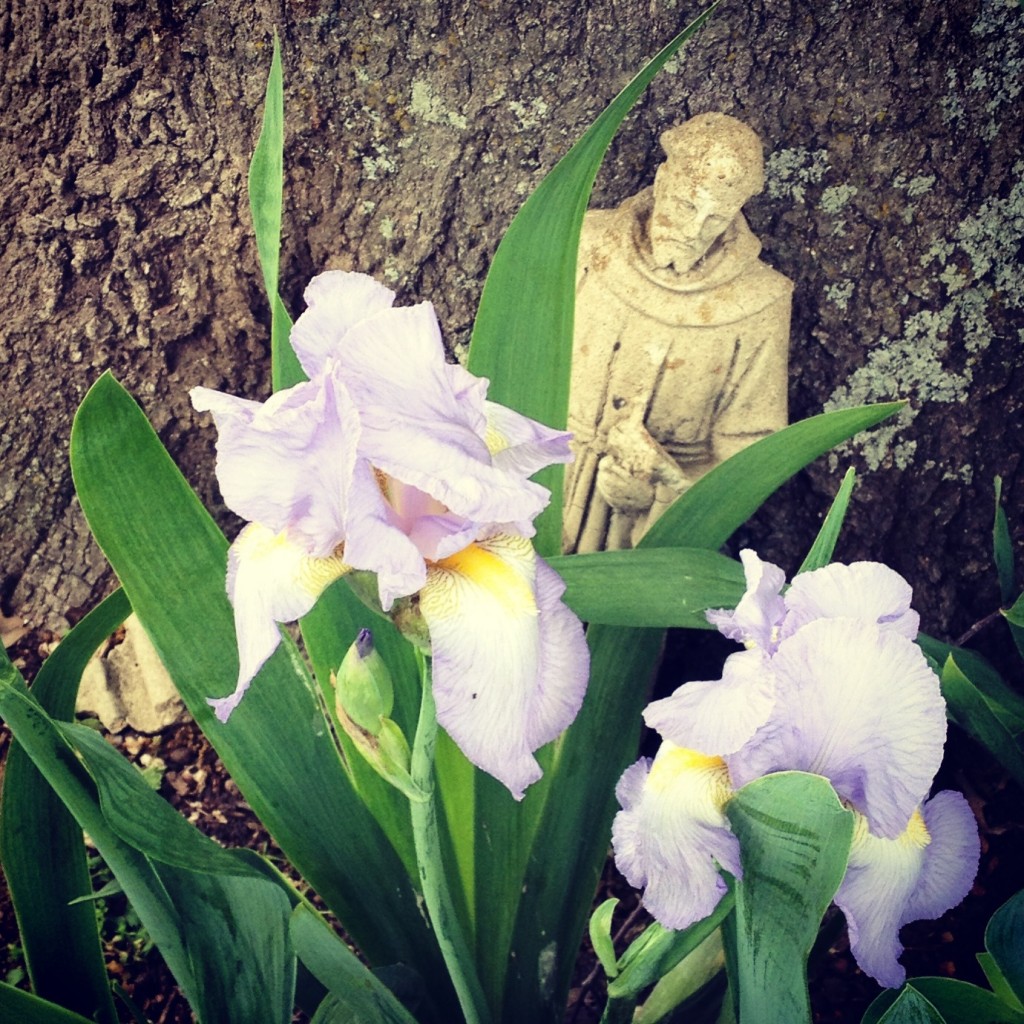
When my grandmother died, my mother bought her house and continued to care for the small cottage garden that had become grandma’s showplace. Around the hand-built rock fountain my grandfather built when I was a toddler, she planted lamb’s ears, azaleas, blue bells, daffodils, and several varieties of iris. All the garden goodness was watched over by a small statue of St. Francis of Assisi.
When my mother died in 2009, the task of cleaning out the house fell to my sister and me. It was difficult to part with the furniture and mementos that mom left behind, but because of the genuine love of the digging in the dirt that seems to be a genetic trait in my family, it was perhaps even harder to give up the years of passionate work that built that garden. One of the final things I did before I left the house for the last time was to fill a few tote bags with iris tubers. And St. Frank. Call me greedy. Or grieving.
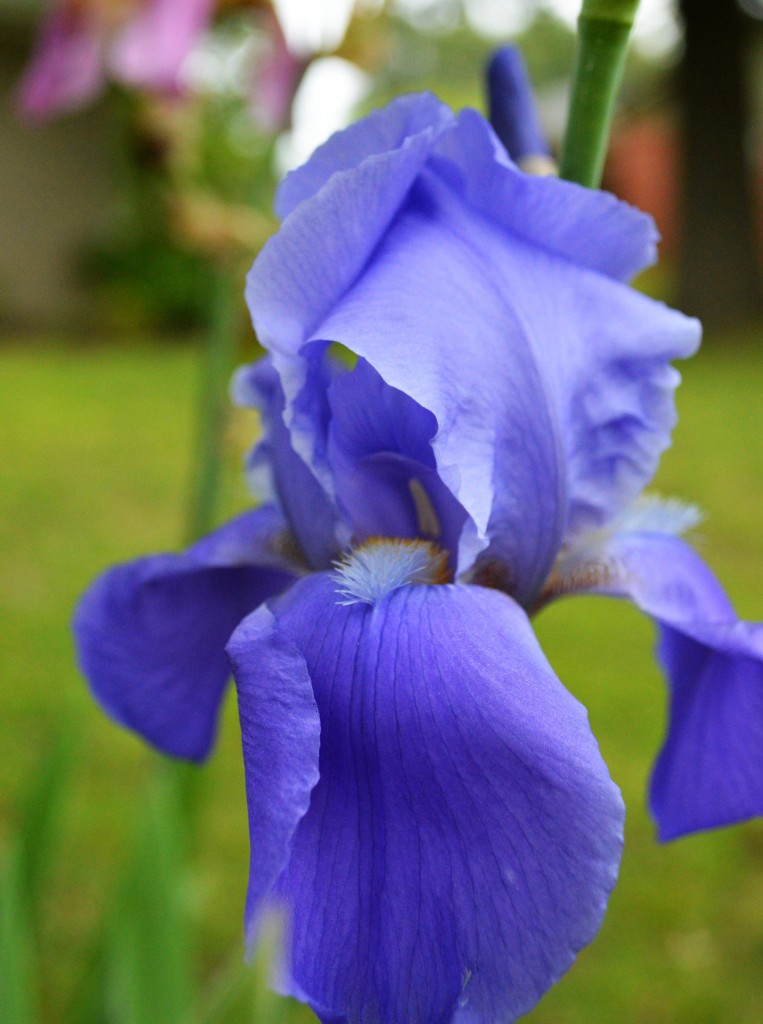
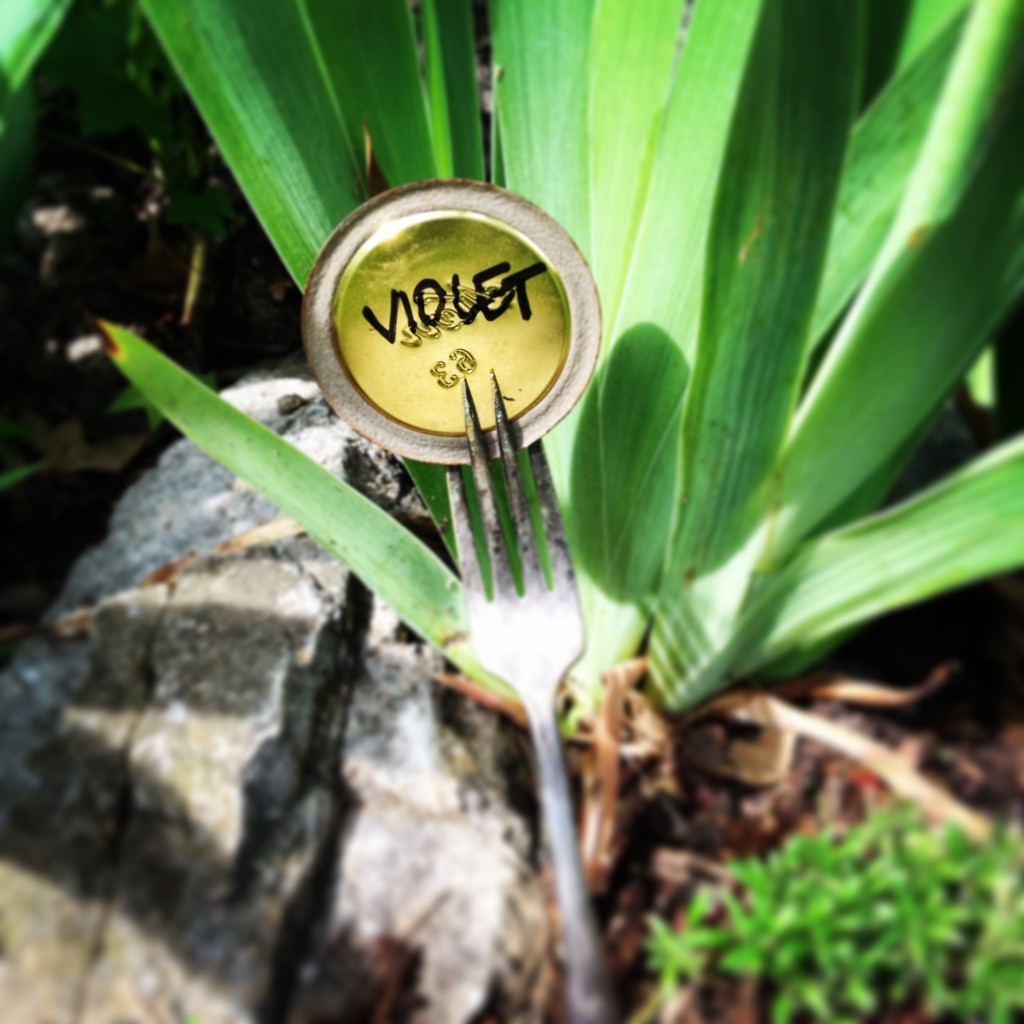
Grandma’s irises have been in the ground in my front yard for several years now, and this year they have apparently reached their adolescence or something, because they are fantastic! There are several purple and lilac varieties, and a pink and gold one that is truly special.
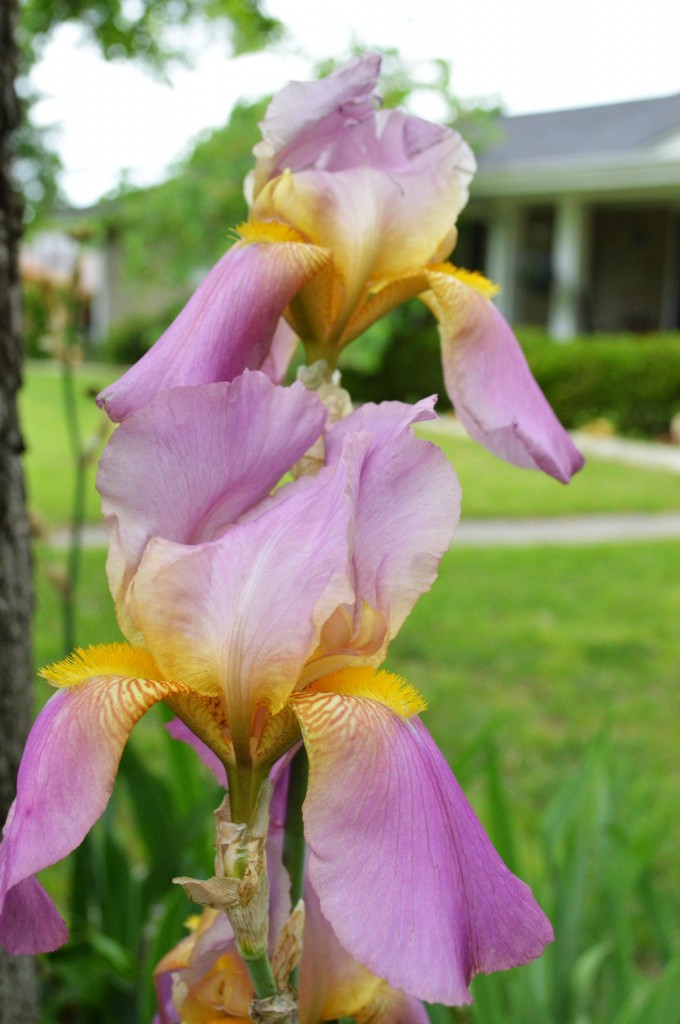
The garden that was already in place in our back yard when we bought our house has provided white, yellow, pink and peach iris as well. It’s been a lovely spring for hand-picked bouquets. I know this fall will be a perfect time to cut a few pieces off to share with friends, so before they stopped blooming, I wanted to mark them.
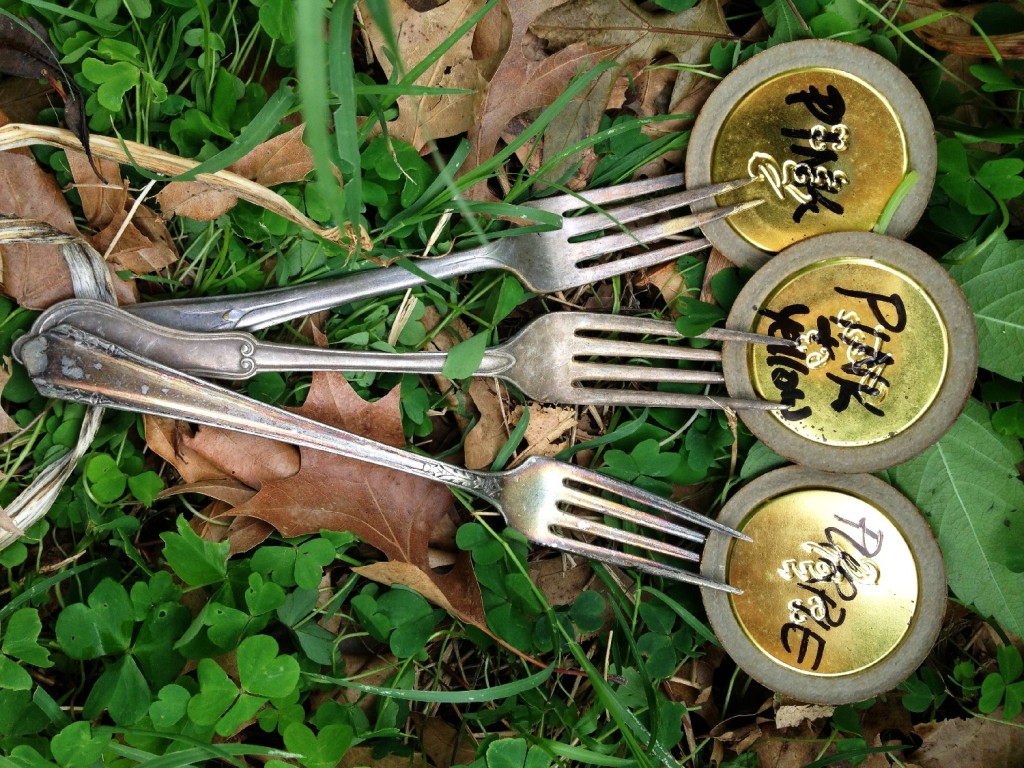
I’ve been collecting mismatched pieces of old silver plate, knowing that I’d find a use for them “someday”. I am drawn to the tarnished and the rusty, you see. To create some plant markers, I dug out a box of old canning lids from my stash, and wrote the flower colors on them before wedging them between the tines of the forks.
I tend to decorate my garden with found and repurposed objects, so these markers fit right in. And they remind me of the thrifty“wear it out” sensibilities of my mother and grandmother. A fitting tribute, don’t you think?
Laurie is a writer and junque-hunter living in Springdale, Arkansas with her husband, son and three goofy cats. She raises kids and chickens and makes messes in her craft room. She loves to create good food, pretty gardens, and happy kids. But when that doesn’t happen as planned, she simply reads about them on Pinterest. You can follow Laurie at See Laurie Write.
Gina is a 30{something}year old lifestyle blogger originally from Michigan now living near Heber Springs, Arkansas. You can catch a glimpse of her everyday life at her blog Desperately Seeking {Gina} where she can be found documenting life with her fiance, stalking her cat, and rehashing what she had for dinner last night. Her sometimes funny, sometimes desperate attempt at figuring out this thing called life might just keep you entertained.
Those in the know say bloggers should monitor trends, write about those trends (to increase page rankings) and even add trending key words into posts to attract the roving search engines. I admit it. In a perverse sort of way, I’m oddly interested in what’s trending on Twitter and Google. Perverse because typically I have no clue and/or interest in the trending topics. I’m dull that way.
I don’t know why I even look. The fascinating (to everyone except me?) topics clogging up cyberspace only make me feel old and out of the loop.
Last week #WhatJayZSaidToSolange was trending on Twitter. I promise you, until that moment, I had no idea who/what/where Solange was. I’m still not sure. And I’m plenty okay with it too.
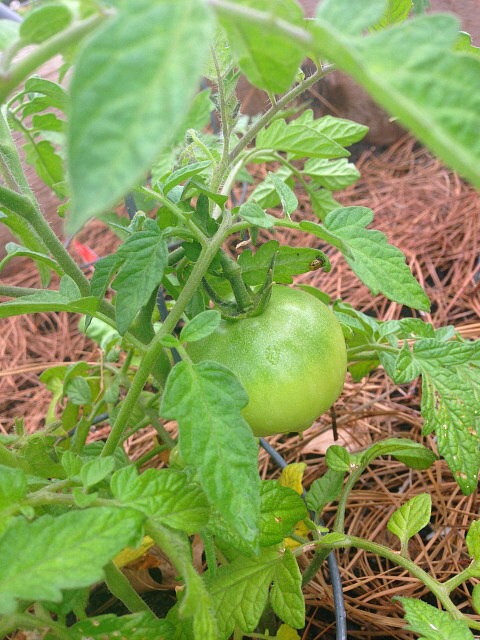
Unless tomatoes start trending, it’s doubtful I’ll be blogging about popular topics.
If I do write about Solange on Grace Grits and Gardening, my handful of faithful readers will surely realize my blog has been hacked. I’d like to believe someone (Colene, Dana, my mother) will check on me, because something is wrong.
Bottom line…I have my own trending topics. Things happening in my life this week. Yesterday. Right now. Ordinary to most, these are the topics that hold my attention and make me happy. And the only drama in the whole batch is how many different ways I can serve onions, because I’ve been blessed with a bumper crop.
Enough yakking. Here are my trending topics along with a photo for you visual folks.
my son’s twenty-first birthday! (nothing ordinary about this, I agree)
fresh strawberry cake (birthday tradition in our family)
No Bieber. No Donald Sterling. Just regular, real life.
One more thing…this is my last Blogger of the Month post. Can you believe we are at the end of May?? THANK YOU Arkansas Women Bloggers and all you readers for indulging me! I hope you’ll keep checking in with me at Grace Grits and Gardening.
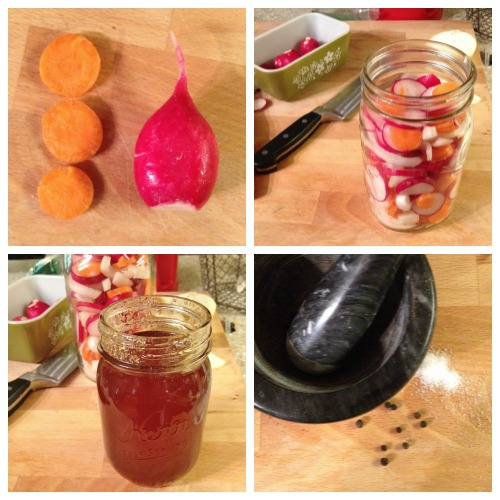
In the dusky Saturday mornings, tables are unfolded and canopy tents are wrestled. Crates and baskets of fresh grown offerings are unloaded while jars of jelly and local honey are stacked into pyramids. Farmers stand anxiously waiting. Waiting for us.
Most farmers markets are just beginning to roll out their wares. And while you may not see much variety right now as the temperatures (hopefully) rise (as we know they always do) so will the selection. Right now we are getting roots and leafy greens. And one of my favorites. Radishes.
I love the spicy crunch of the small red orbs. And they can be delicious in so much more than sliced in your salad or dunked in a vat of ranch. When in doubt, pickle it!
Pickling is a great way to save your farmers market (or your garden) bounty. And a refrigerator pickle like this one is fast and easy and can be used with different vegetables. Since there were radishes and carrots a plenty at the market that is what I am using in this recipe. The color combination looks beautiful and would make a great hostess gift or contribution to any upcoming Memorial Day cook out.
Slice all of your vegetables, toss them together and pack into a quart size jar. If you really want to make a presentation you could put the vegetables in layers.
In a small sauce pan add the remaining ingredients and bring it just to boiling.
Pour the liquid and spices over the vegetables. This will be easier to do with a wide mouth funnel or a measuring cup with a spout.
Use a skewer or knife to help move any bubbles to the surface.
Place the lid on the jar. Once the jar has cooled some then place it into the refrigerator and let it set for 24 hours
By Jeanetta Darley of Splendid Things
Arkansas Women Bloggers https://arkansaswomenbloggers.com/
Jeanetta is a crocheter & coffee addict, chicken keeper & goat wrangler, a farmer girl & maker of drunk jellies.
You can find her online at www.jeanettadarley.com or on twitter, pinterest & instagram @jeanettadarley.
When winter shifts into green grass and wildflowers, a change takes place inside my home, too.
I start flipping through seed catalogs and making mental notes of what new things I’d like to grow. That’s when it begins. Two little boys appear by my side, peering over my shoulder and pointing to the funny purple carrots. Later I find them looking through it by themselves, Nathan with a pencil and Owen’s brown eyes following along.
Their interest in gardening rises with the temperature, and soon they decide they’d rather soak up the sun than whatever is on TV. I have to bribe them to come inside on beautiful spring days, and when the sun is gone, they beg to dance in the rain. Their excitement swells higher with a trip to the nursery and they happily hold the cardboard flats while I pile on my purchases. They jump into seeding, digging, watering, and waiting. My three-year-old goes on daily watermelon hunts and my six-year-old questions the originof canned green beans.
They learn patience and perseverance, disappointment and dedication, and that results often follow hard work.
Growing a garden with three helpers under foot {okay, one sitting in the grass nearby} makes me think. It makes me realize that I’m growing something more than tomatoes and peppers. Owen could pick acucumber seed out of a lineup. Nathan knows which bugs are good and which bugs are terrible. They both know fruits and vegetables trace back further than the grocery store. I don’t have a chalkboard filled with companion plants or quizzes printed to test them on frost dates. I just do what I love, and we all learn. Maybe this hobby will stick with them, but maybe it won’t. I pray the lessons learned in the process, however, will last.
Every season in my little patch has been different. Every season I think I know what I’m getting into, and every season I’m proven wrong. I water and I weed and I worry, but there’s no way to tell what lies ahead. I know the steps to get to harvest, but the journey is different every time. It seems the seasons of motherhood follow the same pattern. No two are ever the same. I simply try my best, learn from what works, and grow from mistakes.
I’m no gardening expert, but I don’t have to be. I garden because I love the smell of tomato plants. I garden because I love the feeling of dirt on my hands. I garden because it provides me with preciousmemories while my children are still young. My garden isn’t the only thing growing before my eyes, and just like the strawberries and squash, I want to do everything I can to help them reach the harvest. It will soon be on them to stretch upward and outward to their full potential, but you better believe I will never be far behind.
I don’t always know where we’re going, and I never know how we’ll get there, but I promise to do everything I can to help my garden and my children grow.
PS: For all you mamas looking for something productive to do this summer, look no further than your yard. It doesn’t take much and it’s not too late to start. Just pick a sunny spot, grab a shovel, and dig. Add some form of compost and garden soil, snag some of the veggie plants left at your local nursery, and get going. I can guarantee this will pique your kids’ interest, and they’ll be working beside you in no time. I know there are plenty of Arkansas Women Bloggers who are much more proficient than me, but if I can do it, so can you. Give it a whirl, and I’d be happy to help if you have any {beginner} questions.
Hey y’all! I’m Jessica and you can find me blogging over at Life With the Bauer Bunch. I’m a small-town girl just enjoying my slice of the good life with my husband Jonathan, our two sons, and our bouncing baby girl. Pull up a chair sometime and watch my garden and my children grow.
Amanda is a former teacher/coach who hung up the whistle when she got promoted to mom. She loves to run, play hide and seek in the house with her kids, put fresh flowers on her table, have game nights, laugh til’ she cries, and go out on dates with her man. Just Living the Adventure! You can find her athttp://www.amandafarris.org
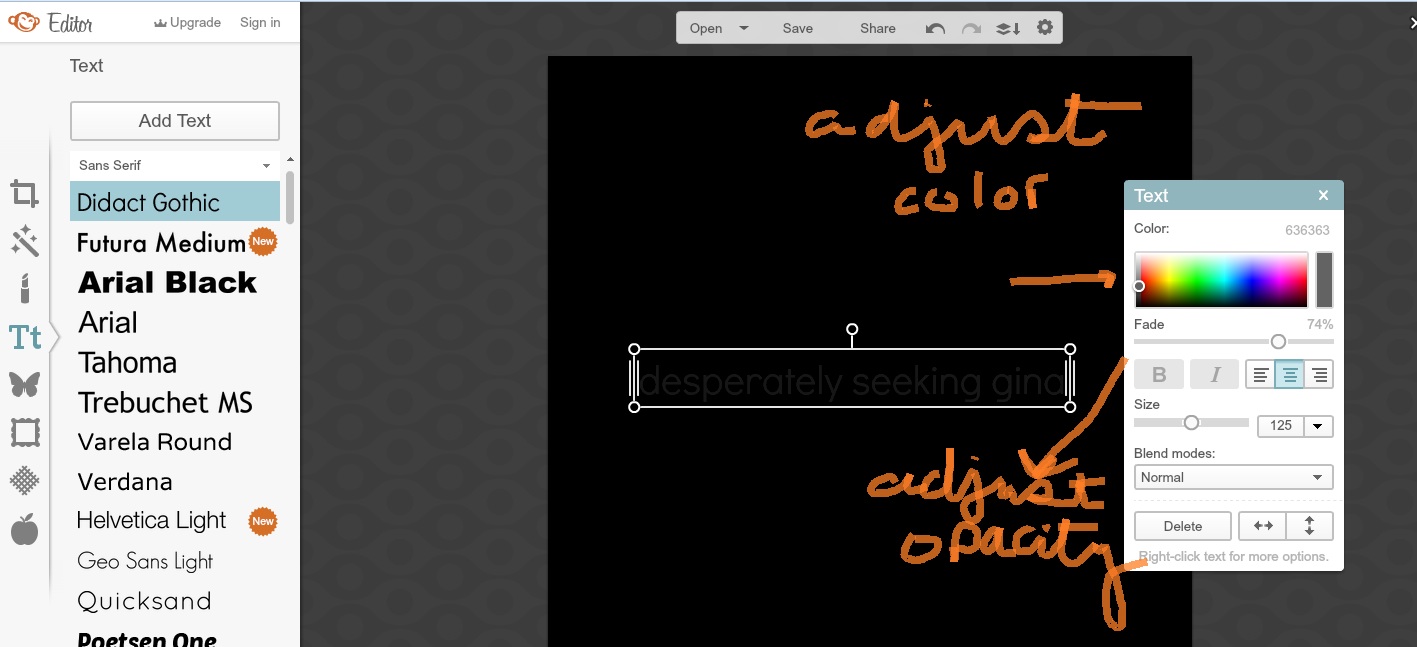
Creating a watermark to add to your blog photos is quick and easy and totally accessible for those who don’t own fancy photo editing software. I’ll show you how in just 8 steps using Picmonkey.
1. Open Picmonkey in your browser and choose “Design.” Choose the square option.
2. Change the canvas color to black for the purpose of editing; we’ll be able to see our design while we work. We’ll change the background again, later.
3. For this tutorial I’m showing you how to use text as your watermark. Hit the “T.” Choose your font. Type your text.
4. Adjust the color and opacity of your watermark text. I suggest using a grey or white. You can adjust here. You’ll also be able to adjust a bit more when you add the watermark to the photo.
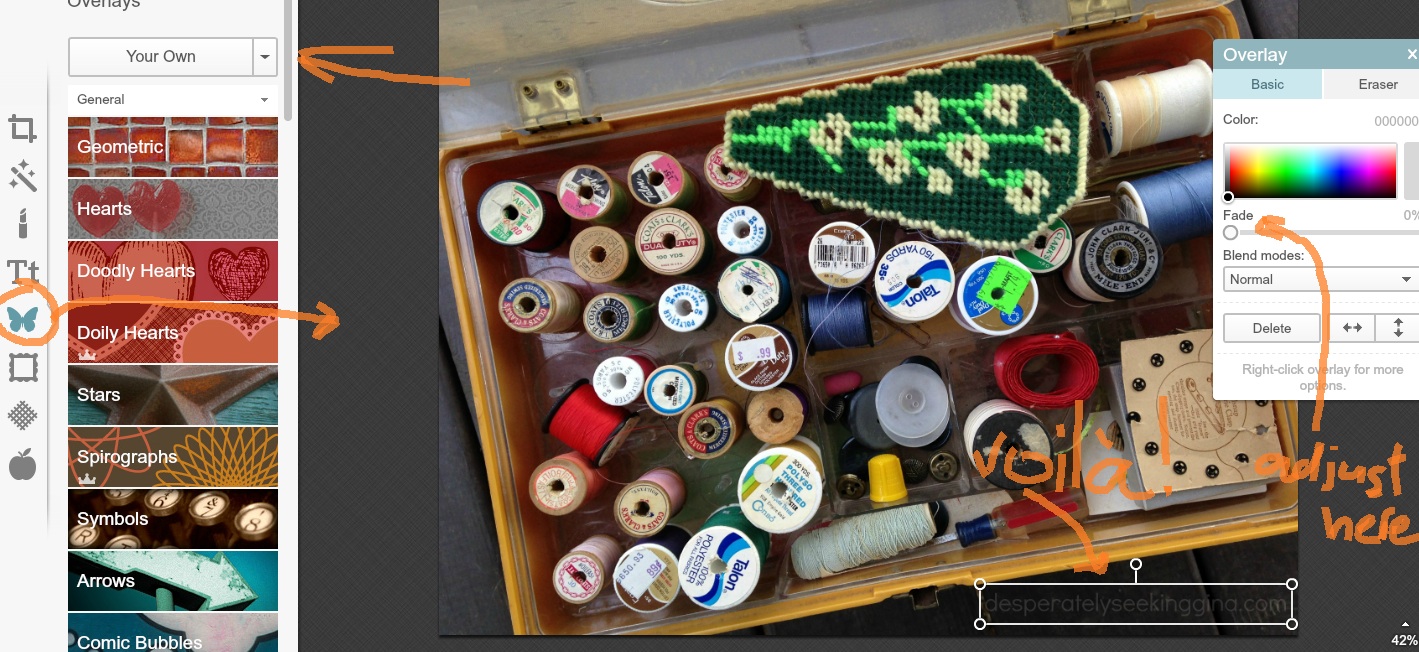
5. Now that you have the text the way you’d like it to appear, crop the image.
6. Now we’ll turn the canvas color to transparent so that only your image will appear. Your watermark text will most likely disappear so be sure to have it exactly the way you want before you complete this step. Hit the “Canvas Color” option on the editing menu. Click “transparent canvas.”
7. We’re ready to save this watermark! Don’t worry, you probably can’t see your image but it’s there, I promise! Be sure to name your watermark and save as a .PNG file. This will ensure that only the text youcreated will appear on your photos.
8. Great! Now open the photo you’d like to watermark. Hit the “Overlay” button on the editing menu; it looks like a butterfly. Click the “Choose Your Own” option, find the watermark you saved and there it is! Yay!! Place the watermark anywhere you’d like. You can adjust the color/opacity as needed. Save your new photo and you’re finished!
Now you can easily add your pre-made watermark to all your photos.


 Laurie is a writer and


 Amanda is a former teacher/coach who hung up the whistle when she got promoted to mom. She loves to run, play hide and seek in the house with her kids, put fresh flowers on her table, have game nights, laugh til’ she cries, and go out on dates with her man. Just Living the Adventure! You can find her at