by Sarabeth Jones
February is the month of love – and we all like to take pictures of something or someone we love. It’s one of my favorite things. And while I’m not a professional photographer, I have been taking pictures for a really long time – and I’ve learned a few things along the way. Here are five simple tips that will help your photos be better. For the sake of simplicity, I’m going to use photos from my iPhone, since that’s the way I (and I bet you) take the majority of my everyday pictures.
1. Get Closer
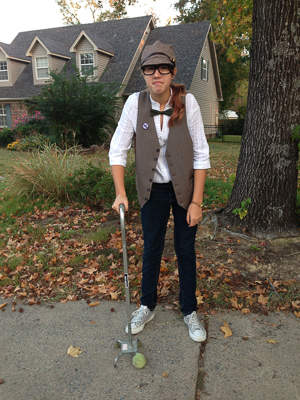
If I could only tell you one thing, it would be this: get close to what you are shooting. Every so often you will be taking a landscape picture or a large group shot that needs some distance, but mostly, you want us to see one thing that you are taking a picture of. Get closer. You don’t need all the extra. Here’s an example from last Halloween, when my daughter dressed up as Carl Frederickson, the little old man from Up. This is the original photo:

Yes, she’s adorable. But this picture doesn’t emphasize some of the really cute parts of her costume. Plus, there’s a lot of other business going on: my neighbor’s house, my completely unkempt yard…clearly, things could be better. Here’s what happened when I got closer:

I took pictures of the details, and made a collage. Now you can see her hat, her homemade button, her walker. Even the full-length shot is better when it’s cropped closer.
2. Use Natural Light
Otherwise known as Don’t Use Your Flash. You don’t need it. Drag your kids outside to take that photo, place your plate of food by the window. I promise, it’s worth the little bit of extra trouble. Okay, there will sometimes be pictures you want to take at night when you have to use your flash. Go ahead. But during the daylight? Don’t use it. That blink of light is flattening out your picture, taking away its depth and color. I don’t have an example for you on this one because I really just never use it. I’m kind of a stickler about this one. Use natural light.
3. Get a Different Angle
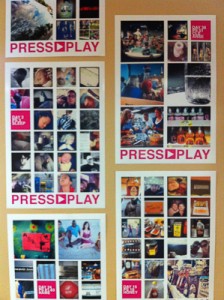
Play around with the angle that you take your picture from: bend down, shoot from overhead, walk around to the side. Recently I took some pictures of a group of posters. I started with a straight on shot…
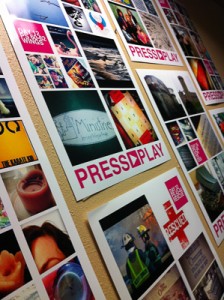
but after several tries, ended up liking this angled up, shot from the side version.
4. Work for Your Point of View
This really just means think about what you are trying to say with your picture. I like to take pictures of drinks. Sometimes I’m trying to say I’m eating healthy…
And sometimes I’m saying I’m out having fun with friends.

Both are pictures of colorful drinks, but they say different things. In the first picture, the overhead angle helps you see the texture of the smoothie and the corner of the bowl of oatmeal. The simplicity of the picture – even the mason jar – all help communicate the idea of clean & healthy. In the second picture, the fact that you can see different drinks lets you know there’s a party going on. In both cases, some of it just happened, but some of it was arranged. Yes, I did shove all my friends’ drinks to the middle of the table before I would let them imbibe. A little shoving can make a great picture – work for your point of view!
5. Keep looking, keep trying
Sometimes you know you want a picture but it just isn’t quite coming out the way you want. Keep trying (and remember that you don’t have to post every try). When it snowed over Christmas I went out walking with my kids. The sun was shining and the snow and ice were gorgeous. But I just wasn’t getting it. I have about 10 different versions of this sort of shot from that day:
The snow looks grey. The ice is not sparkling. It wasn’t living up to what I could see right in front of me. So I kept taking pictures. And then, finally, I found the right line of trees, the right angle against the sun…
Everything I wanted to remember about this afternoon is right there. Keep trying!
Bonus: Favorite iPhone photography apps:
- Camera+ for the cropping, clarity filter, fun effects (free!)
- Snapseed for tweaking and cropping (free!)
- Tilt Shift Generator for great color, tilt shift, and vignetting (99 cents)
- Vintique for some really fun filters (99 cents)
- Diptic for multiple image collages (99 cents)
Hope these are helpful – now go find some things you love and take some great pictures!
Sarabeth Jones works in all things creative at Fellowship North, including design, writing, acting, directing, and photography. She overshares in words and pictures at The Dramatic and would love to connect with you there or on Facebook, Twitter, Instagram, or Pinterest.
***Arkansas Women Bloggers is kicking-off a new Wordless Wednesday series – we welcome your photo submissions! Our 2013 theme is Fall in Love with Arkansas. Please send your photos to Stephanie today!


Thanks! I couldn’t remember the sites you told me and was ashamed to ask again! 🙂
You can always ask, Michelle!
Great tips, Sarabeth! Thank you for sharing… keep sharing because I need it!
Lyndi
Thank you, Lyndi!
Thanks for the tips, Sarabeth. I love visiting your blog for all the beautiful pictures!
Gina – I feel the same way about yours. Thank you!
I am a photo junkie and use all these tips! You never know when you will need a photo for a blog post:))
Absolutely! I feel the same way.
Thanks for all of the helpful hints. Thanks as well for the IPhone recs.
Well done, Stephanie!
That is alright, I will pass it on to Sarabeth. Yes, very well done. She is extraordinary.
Sarabeth, APOLOGY! Had just read something by Stephanie and OOPS—Brunette moment!
Why, Rhonda Mills!! So glad to see you here on AWB! Hope to see you at our bloggy conference this year!
Apparently our paths will always cross. 🙂
~ Beth (www.LittleMagpie.org)